Ultimate No-Bake Chocolate Peanut Butter Truffles (Homemade Bite-Sized Dessert Guide)
(Keyword-rich, SEO-optimized, original rewritten recipe guide)
Introduction: The Irresistible No-Bake Peanut Butter Chocolate Treat Everyone Loves
If you are searching for an easy no-bake dessert, quick sweet snack, or holiday treat idea that requires minimal effort but delivers maximum flavor, these homemade peanut butter chocolate balls are exactly what you need. This simple yet indulgent recipe combines smooth peanut butter filling with a rich chocolate shell, creating a melt-in-your-mouth truffle-style dessert that is perfect for celebrations, gifting, or everyday cravings.
Often referred to as peanut butter chocolate truffles, chocolate peanut butter bites, or no-bake peanut butter balls, this dessert has become a favorite across home kitchens worldwide due to its simplicity, affordability, and crowd-pleasing taste.
What makes this recipe especially appealing is that it does not require an oven. Instead, the ingredients come together using basic mixing, rolling, chilling, and dipping techniques. Even beginners with no baking experience can achieve bakery-style results at home.
These chocolate peanut butter balls are:
Quick to prepare with simple pantry ingredients
Perfect for holiday dessert trays and festive gifting
Ideal for kids’ cooking activities
Freezer-friendly for long-term storage
Customizable with toppings and decorations
With just a handful of everyday ingredients, you can create a professional-quality chocolate dessert that tastes like it came from a premium confectionery shop.
Why These Chocolate Peanut Butter Balls Are So Popular (Trending Dessert Idea)
This recipe continues to trend in “easy no-bake desserts,” “holiday dessert recipes,” and “quick chocolate treats” because it delivers everything modern home cooks look for:
1. No Baking Required Dessert Convenience
There is no need to preheat an oven or worry about baking times. Everything is prepared in a mixing bowl and chilled.
2. Perfect Sweet and Salty Flavor Balance
The creamy peanut butter filling pairs beautifully with the semi-sweet chocolate coating, creating a balanced dessert experience.
3. Ideal for Holiday Treat Boxes and Gifting
These bite-sized chocolate balls look elegant when packed in decorative tins or dessert boxes.
4. Beginner-Friendly Dessert Recipe
Even if you have never made candy or truffles before, this recipe is extremely forgiving and easy to follow.
5. Great Make-Ahead Dessert Option
You can prepare them days or even weeks in advance and store them in the refrigerator or freezer.
Essential Kitchen Tools for Perfect Results
To make your homemade peanut butter chocolate balls smooth, round, and professional-looking, gather the following kitchen tools:
Microwave or stovetop setup for melting chocolate
Medium and large mixing bowls
Hand mixer or stand mixer for creamy blending
Baking tray for setting the shaped balls
Parchment paper or silicone baking mat
Cookie scoop or tablespoon for even sizing
Fork, dipping tool, or skewer for chocolate coating
Spatula for scraping and mixing
Having these tools ready ensures a smooth workflow from start to finish and helps maintain consistent texture and shape.
Step-by-Step Guide to Making Peanut Butter Chocolate Balls
1. Creating the Creamy Peanut Butter Dough Base
The foundation of this recipe is a rich, sweet, and smooth peanut butter mixture. Getting the texture right is key for perfect truffle-style balls.
Start by using softened unsalted butter. This should be at room temperature so it blends easily. Beat it until it becomes light and creamy. Next, add creamy peanut butter and continue mixing until fully incorporated into a smooth mixture.
Gradually add confectioners’ sugar while mixing to form a thick dough-like consistency. This step transforms the mixture into a moldable base that holds its shape when rolled.
Add pure vanilla extract to enhance aroma and flavor depth. Finally, add a small pinch of salt to balance sweetness and elevate the chocolate-peanut butter flavor combination.
At this stage, the mixture should be soft yet slightly crumbly. If it feels too dry, the natural warmth of your hands will help bring it together during rolling.
2. Rolling the Mixture into Bite-Sized Balls
Once the dough is ready, use a cookie scoop or tablespoon to portion out equal amounts. This helps ensure uniform size, which is important for even chocolate coating and presentation.
Roll each portion between your palms until smooth and round. Place each ball onto a parchment-lined tray.
If the mixture becomes too soft or sticky, refrigerate it for 10–15 minutes before continuing. Lightly dusting your hands with confectioners’ sugar can also help prevent sticking.
3. Chilling for Firm Texture and Easy Dipping
Chilling is an essential step in no-bake dessert recipes like this. It allows the peanut butter balls to firm up so they hold their shape during chocolate coating.
Place the tray in the refrigerator and chill until firm. This helps prevent cracking or melting when dipped into warm chocolate later.
You can also prepare them a day ahead, making this a perfect make-ahead dessert option for parties or holidays.
4. Preparing a Smooth Chocolate Coating
For the best chocolate peanut butter truffles, use high-quality semi-sweet chocolate bars. Chop them into small pieces so they melt evenly.
Add a small amount of vegetable oil to the melted chocolate. This improves texture, making the coating smoother, shinier, and easier to dip.
You can melt the chocolate using either:
A microwave in short intervals, stirring frequently
A double boiler over gentle heat for controlled melting
Once melted, let the chocolate cool slightly so it is warm but not too hot when dipping.
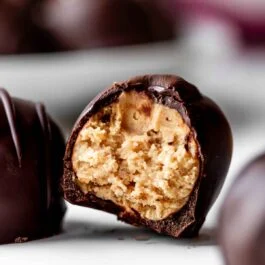
5. Coating Each Peanut Butter Ball in Chocolate
Remove chilled peanut butter balls from the refrigerator.
Using a fork or dipping tool, carefully dip each ball into melted chocolate until fully coated. Lift it out and gently tap off excess chocolate to create a smooth finish.
Place it back onto the lined tray. Repeat for all pieces.
For decoration, you can sprinkle toppings immediately before the chocolate sets. Popular options include crushed peanuts, chocolate drizzle, sea salt flakes, or colorful sprinkles.
6. Final Setting and Texture Development
After coating, refrigerate the chocolate peanut butter balls again until the chocolate shell is completely firm.
Once set, transfer them into an airtight container for storage.
These treats taste even better after resting for a few hours as the flavors blend together perfectly.
Storage Instructions for Long-Lasting Freshness
Proper storage helps maintain texture and flavor:
Refrigerate for up to 2 weeks
Freeze for up to 3 months
Keep at room temperature for short periods (about 1–2 days depending on climate)
When freezing, thaw in the refrigerator overnight before serving for best texture.
Expert Tips for Perfect Peanut Butter Chocolate Balls
Always use creamy peanut butter for best consistency
Avoid natural peanut butter as it may separate and affect texture
Do not skip chilling, as it prevents melting during dipping
Add vegetable oil to chocolate for glossy finish
Use uniform sizing for professional presentation
Experiment with toppings for visual appeal
Serving Ideas and Creative Variations
These chocolate peanut butter balls can be served in multiple ways:
As party desserts on festive platters
With coffee or tea as a sweet snack
In gift boxes for holidays or birthdays
As freezer-friendly emergency desserts
Optional enhancements (without changing base recipe):
Sprinkle crushed nuts for crunch
Add festive colored sprinkles
Drizzle white chocolate for contrast
Why This Recipe Works So Well (Food Science Insight)
The success of this dessert comes from the combination of fat, sugar, and cocoa solids. Peanut butter provides creamy richness and structure, while confectioners’ sugar stabilizes the mixture. Chocolate creates a protective shell that locks in moisture and flavor.
The result is a balanced bite-sized dessert that melts smoothly in the mouth while offering a slight crunch from the chocolate coating.
Conclusion: A Simple Yet Luxurious Homemade Dessert
These no-bake peanut butter chocolate balls are proof that you don’t need complicated techniques or expensive ingredients to create a luxurious dessert at home. With their creamy center and rich chocolate shell, they deliver bakery-level quality in a simple homemade format.
Whether you are preparing them for holiday celebrations, family gatherings, or personal cravings, this easy recipe guarantees consistent success and delicious results every time.
Simple Quick Recipe Version
Ingredients
6 tablespoons (85 g) unsalted butter, softened
1 cup (250 g) creamy peanut butter
2½ cups (300 g) confectioners’ sugar
½ teaspoon pure vanilla extract
⅛ teaspoon salt
12 ounces (339 g) semi-sweet chocolate bars, chopped
1 teaspoon vegetable oil
Optional: Sprinkles for garnish
Instructions
Beat softened butter until creamy.
Mix in peanut butter until smooth.
Add confectioners’ sugar, vanilla, and salt. Mix into dough.
Roll into 1-inch balls and place on tray.
Chill in fridge for 1 hour.
Melt chocolate with vegetable oil using microwave or double boiler.
Dip chilled balls into chocolate and place back on tray.
Add sprinkles if desired.
Chill again for 30 minutes until set.
Serve or store in airtight container.