Soft and Fluffy Homemade Donuts
The Ultimate Homemade Donut Recipe for Soft, Fluffy Results
Homemade Donuts Are Worth Making
Homemade donuts have a special appeal that packaged versions simply cannot match. Fresh from the fryer, these yeast donuts are soft in the center, lightly crisp on the outside, and wonderfully tender throughout. This easy donut recipe uses a simple yeast dough made with milk, butter or margarine, flour, sugar, yeast, and egg, so you do not need a long list of complicated ingredients to make something delicious. Whether you prefer classic sugar-coated donuts or want to finish them with a sweet glaze, this recipe gives you a versatile base that can be enjoyed in several different ways. If you have ever wondered how to make donuts at home without specialist baking skills, this straightforward recipe is an excellent place to begin.
What Makes These Yeast Donuts So Soft and Fluffy
The texture of a homemade donut depends heavily on the dough, and yeast plays an important role in creating that light, airy texture. Unlike a cake-style donut that relies on baking powder or baking soda, these are traditional yeast donuts that need time to rise before frying. The yeast helps the dough expand, creating the small pockets of air that give the finished donuts their characteristic softness. Milk and butter or margarine also contribute to the tender texture, while the egg adds richness and helps bring the dough together. Proper kneading and two separate rising periods are equally important because they allow the dough to develop structure while becoming light enough to puff beautifully in hot oil.
Simple Ingredients for a Classic Donut Dough
One of the best features of this homemade donut recipe is how uncomplicated the ingredient list is. You need 120 ml milk, 60 g block margarine or butter, 275 g strong white flour, 40 g caster sugar, 7 g easy bake instant yeast, one free-range egg, and oil for frying. These ingredients work together to create a soft dough that can be rolled and shaped before its second rise. Strong white flour, also commonly called bread flour, is particularly useful because its higher protein content helps the dough develop strength and elasticity. The quantities should remain exactly as listed because changing the proportions can affect the dough consistency, rise, and final texture. For consistent baking results, weighing the ingredients is a reliable approach.
Choosing Flour for the Best Donut Texture
Strong white flour is the preferred choice for these fluffy homemade donuts because it provides the structure needed for a yeast-raised dough. When the dough is kneaded, the flour develops gluten, creating an elastic network that can hold the gases produced during fermentation. That structure helps the donuts rise instead of becoming dense or heavy. Plain flour can work if that is all you have available, but the result may be somewhat less light and airy. If your goal is to make soft fried donuts with a bakery-style texture, strong white flour is the better option. Measuring the flour carefully is also important. Too much flour can produce a stiff dough, while too little can leave the mixture excessively sticky and difficult to shape.
Preparing the Milk and Butter Mixture
The first practical step is gently warming the milk together with the butter or margarine. Place both in a small saucepan and heat them over a low temperature until the butter or margarine begins to melt. The mixture should not be allowed to become very hot. After warming, remove the saucepan from the heat and let the mixture cool slightly before adding it to the other ingredients. This small detail matters because yeast dough responds best when its ingredients are at a suitable temperature. A mixture that is excessively hot can interfere with the yeast, while a comfortably warm or slightly cooled mixture can be incorporated more easily. Taking a little care at this stage helps create a better environment for the dough to rise properly.
Combining the Ingredients Into a Soft Dough
Once the milk mixture has cooled slightly, prepare the dry ingredients in a large bowl. Sift the strong white flour and caster sugar into the bowl, then add the easy bake instant yeast and mix everything gently. Make a well in the center and add the milk mixture along with the free-range egg. Stir until the ingredients come together into a soft, slightly sticky dough. Depending on the consistency, you may find it easiest to finish bringing the mixture together with your hands. At this stage, resist the temptation to add large amounts of flour simply because the dough feels sticky. A soft dough is desirable for fluffy donuts, and the consistency will become easier to manage as kneading develops the gluten.
Kneading the Dough for a Light and Elastic Result
Kneading is one of the most important parts of making yeast donuts because it develops the gluten that gives the dough strength and elasticity. Turn the dough onto a well-floured work surface and knead it with floured hands, adding more flour only when necessary. Continue for approximately 10 minutes, working the dough until it becomes smoother, stretchy, and more elastic. The dough should feel noticeably different from when you first mixed it. Properly kneaded dough is better able to hold the air produced during the rising process, which contributes to the soft texture of the finished donuts. Take your time rather than rushing this step, because thorough kneading can make a significant difference to the final structure.
Giving the Dough Its First Rise
After kneading, place the dough into a lightly oiled bowl so that it does not stick during rising. Cover the bowl with an oiled piece of cling film or a damp tea towel and place it somewhere warm and free from drafts. Leave the dough for approximately one hour, or until it has doubled in size. The exact timing can vary depending on the temperature of your kitchen, so the visual change in the dough is more useful than relying only on the clock. A properly risen dough should look noticeably larger, lighter, and puffier. Allowing sufficient time for this first rise helps develop the airy texture that makes homemade yeast donuts so appealing.
Shaping the Donuts After the First Rise
When the dough has doubled in size, gently knock it back to remove some of the accumulated air, then knead it lightly on a floured surface. Roll the dough to approximately 1 cm thickness. You can shape the donuts using a dedicated donut cutter or use two round cutters, with one larger cutter for the outside and a smaller cutter for the center. Try to cut the shapes efficiently so that you do not unnecessarily overwork the dough. Place each shaped donut on its own square of greaseproof paper, leaving enough room between the pieces for them to expand. This individual-paper method also makes transferring the delicate risen donuts into the hot oil much easier.
The Second Rise Creates Extra Fluffy Donuts
The second rise is another key step in achieving soft and fluffy homemade donuts. Once the donuts have been shaped and placed on individual pieces of greaseproof paper, cover them again with oiled cling film or a damp tea towel. Leave them in a draft-free place for approximately one hour, or until they have puffed up to around twice their original size. Do not skip this stage simply to save time. The second rise gives the shaped dough an opportunity to become lighter and more aerated before frying. Well-risen donuts are generally more delicate and airy than donuts that go straight from cutting to the fryer. Handle them gently once they have puffed up so you do not unnecessarily deflate the dough.
Getting the Frying Oil to the Right Temperature
Frying temperature is essential when making traditional fried donuts. Heat the oil in a large saucepan to approximately 180°C or 350°F, and use a food thermometer whenever possible for accuracy. The oil needs to be deep enough for the donuts to fry comfortably without sticking to the bottom of the pan. The amount of oil required will depend on the size and shape of your saucepan. If the oil is too cool, the donuts can absorb excessive oil and become heavy. If the oil is too hot, the outside can brown before the inside has had enough time to cook. Maintaining approximately 180°C gives the donuts a good opportunity to become golden brown while cooking through properly.
Frying the Donuts Safely and Evenly
Once the oil has reached the correct temperature, carefully transfer the risen donuts into the pan using their greaseproof paper squares as a guide. Exercise extreme caution because hot oil can cause serious burns. Gently lower each donut into the oil rather than dropping it from a height. Fry for approximately 90 seconds on the first side, then carefully turn and cook the other side for another 90 seconds. The donuts should become a beautiful golden brown as they cook. Work in small batches rather than overcrowding the saucepan. Adding too many donuts at once can cause the oil temperature to fall quickly and may also make the donuts touch or stick together while frying.
How to Know When the Donuts Are Cooked
A properly fried donut should have an even golden-brown exterior and should feel light rather than excessively heavy. Once both sides have reached the desired color, use a slotted spoon to lift the donut from the oil. Hold it above the saucepan for around 10 seconds so excess oil can drain away before transferring it to a wire cooling rack. Continue cooking the remaining donuts in small batches, keeping an eye on the thermometer throughout the process. Because each batch can affect the temperature of the oil, adjust the heat as necessary. Paying attention to the oil temperature is one of the simplest ways to improve the consistency of homemade fried donuts and avoid an overly greasy or undercooked result.
Sugar-Coated Donuts for a Classic Finish
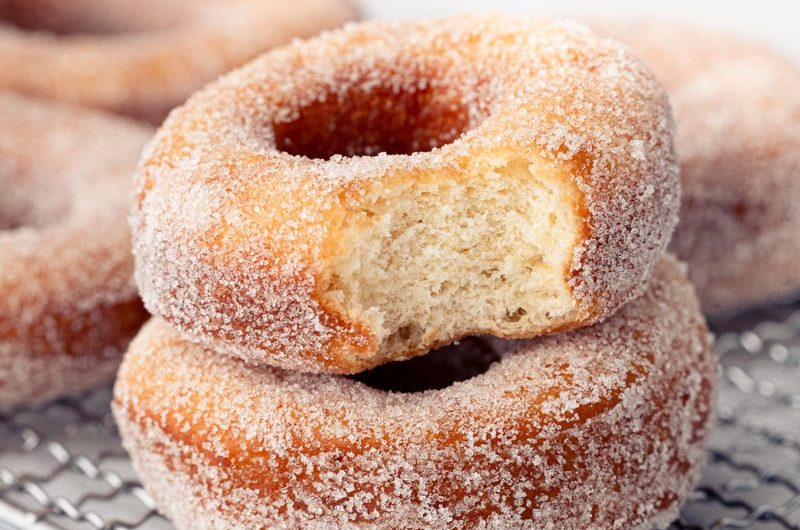
If you love traditional sugar donuts, the simplest finishing method is to coat the freshly fried donuts while they are still warm. Place an appropriate amount of sugar in a shallow dish and turn the warm donuts through it so the surface becomes lightly coated. The warmth helps the sugar adhere to the exterior, creating the familiar sweet finish associated with classic fried donuts. Sugar coating is especially appealing when you want a quick and uncomplicated topping without preparing a separate glaze. The contrast between the tender interior, lightly crisp exterior, and sweet sugar coating makes these donuts satisfying while still keeping the preparation simple. Serve them fresh for the best texture and flavor.
How to Finish Homemade Donuts With Glaze
A sweet glaze provides another easy way to transform these basic yeast donuts into glazed donuts suitable for breakfast, dessert, parties, or special occasions. If you are using a simple glaze or icing topping, the donuts can be glazed while they are still warm, depending on the type of finish you want. For an icing-style topping, allowing the donuts to cool completely can make the coating easier to control and prevent it from becoming excessively runny. The basic donut dough is intentionally versatile, so you can keep the topping simple or adapt the finished donuts to suit the occasion. Whether you prefer sugar-coated donuts or glazed donuts, the same soft fried base works beautifully.
Egg Size and Its Role in the Recipe
Egg size can sometimes cause confusion when following recipes because sizing systems differ between countries. This recipe uses one free-range egg, and a medium egg in the UK is roughly comparable to a large egg in the United States. For most home bakers, using a suitable egg within this general range should work well. The egg contributes richness and helps bind the dough, but it does not need to be treated as a complicated ingredient. If you regularly bake, using the same approximate egg size each time can help maintain consistency. For the most dependable results, especially when baking professionally or making several batches, weighing ingredients is generally more precise than relying solely on volume measurements.
Milk Choices for Homemade Donuts
Milk is another ingredient that offers some flexibility while keeping the original quantity unchanged. The recipe calls for 120 ml milk, and different varieties can be used depending on what you normally keep at home. Full-fat milk, semi-skimmed milk, soya milk, and oat milk can all be suitable options for this style of donut dough. The choice may slightly influence the richness or flavor, but the overall method remains the same. Whichever milk you choose, make sure the milk and butter or margarine mixture is not excessively hot when it is incorporated into the dough. Keeping the ingredient temperature under control is more important than using a particular milk variety.
Why Digital Scales Can Improve Baking Results
Using digital scales is particularly helpful for recipes involving yeast dough because accurate ingredient proportions contribute to predictable dough consistency. Measuring 275 g of strong white flour and 40 g of caster sugar by weight gives you a more reliable result than repeatedly estimating the amounts with cups or spoons. Cup measurements can vary depending on how ingredients are packed, leveled, or scooped, whereas weight provides a consistent measurement. This is especially useful if you want to make homemade donuts regularly or need to reproduce the same results across multiple batches. If a digital scale is available, weighing the ingredients is a simple habit that can improve accuracy without making the recipe more complicated.
Common Donut-Making Problems and How to Avoid Them
Several common mistakes can affect homemade donuts, but most are easy to prevent. Dough that has not been kneaded enough may lack the elasticity required for a light texture, while insufficient rising time can produce dense donuts. Adding excessive flour can also make the dough tougher than intended. During frying, overcrowding the pan can reduce the oil temperature and lead to greasy results, while excessively hot oil may brown the outside too quickly. Another important point is handling the risen donuts gently because they are full of air and can lose volume if pressed too firmly. By giving the dough enough time to rise, maintaining the correct oil temperature, and working carefully, you can make consistently soft yeast donuts.
Storing Homemade Donuts for Later
Fresh homemade donuts are at their best on the day they are made because their texture is softest and most enjoyable shortly after frying. If you have leftovers, store them in an airtight container at room temperature for up to two days. Over time, the donuts may gradually become less fluffy, which is normal for homemade yeast-based baked and fried goods. Keeping them properly covered helps prevent them from drying out unnecessarily. If you know you will not eat the entire batch within a day, freezing is a useful option. Allow the cooked donuts to cool completely before placing them into a freezer-safe container or bag. For the best result, freeze the donuts before adding sugar coating, glaze, or fillings.
Freezing Donuts for Longer Storage
Cooked homemade donuts can be frozen for up to three months when properly packed. Once the donuts have cooled completely, place them in a suitable freezer-safe container or bag, removing excess air where practical before sealing. When you are ready to enjoy them, allow the donuts to defrost at room temperature. Freezing them without toppings is recommended because sugar coatings, glazes, and fillings can change in texture during freezing and thawing. Once thawed, you can add the desired topping before serving. Freezing provides a convenient way to prepare the donuts ahead of time, particularly if you are making them for a gathering, celebration, weekend breakfast, or another occasion where you want homemade donuts available without preparing the dough from scratch on the same day.
Notes for Better Homemade Donuts
For the softest homemade donuts, focus on the details that have the biggest effect: use strong white flour, knead the dough thoroughly, allow both rises to take place, and maintain the frying oil at approximately 180°C or 350°F. Avoid rushing the proofing process simply because the dough seems ready before the recommended time; kitchen temperature can influence how quickly yeast works. When frying, small batches are preferable because they help maintain the oil temperature. Always take care when working with hot oil and use a food thermometer for greater accuracy. Finally, decide on your topping before frying the final batch so you can coat sugar donuts while warm or prepare the donuts for glazing at the appropriate stage.
Frequently Asked Questions About Homemade Donuts
One common question is whether these donuts can be made without strong white flour. Plain flour can be used if necessary, although the finished donuts may not be quite as light and airy. Another question concerns the choice of milk, and several varieties can work successfully while keeping the stated quantity unchanged. Many home bakers also wonder whether donuts must be fried in small batches. Small batches are strongly recommended because overcrowding can lower the oil temperature and cause the donuts to stick together. If you are deciding between sugar and glaze, both are suitable finishing choices. Sugar gives a classic coating, while glaze provides a sweeter, more decorative finish. These simple choices allow one dough to produce several styles of homemade donuts.
Serving Ideas for Fresh Fried Donuts
Fresh yeast donuts are versatile enough to serve in many different settings. A sugar-coated version makes a simple snack alongside tea, coffee, or milk, while glazed donuts can be presented as a dessert or sweet treat for guests. They can also be arranged on a serving platter for birthdays, family gatherings, weekend breakfasts, or afternoon celebrations. Because the donuts are best when fresh, timing the frying and coating close to serving can make the experience even better. You can prepare the dough earlier, allow the first rise to take place, shape the donuts, and then complete the second rise before frying. This makes the recipe practical for occasions when you want warm homemade donuts without complicated preparation.
Making Perfect Yeast Donuts
The key to this easy donut recipe is patience rather than complicated technique. Start by gently warming the milk and butter or margarine, then combine the mixture with flour, sugar, yeast, and egg to form a soft dough. Knead it until smooth and stretchy, allow it to double in size, then roll and cut the donuts before giving them another rise. Fry the shaped dough carefully at approximately 180°C or 350°F, cooking each side for around 90 seconds or until golden brown. Drain the finished donuts on a wire rack and coat them while warm if using sugar, or prepare them for glazing according to your preferred finish. Follow these stages carefully and you can enjoy soft, fluffy homemade donuts with a classic fried texture.
Structured Recipe Card
Soft and Fluffy Homemade Donuts
Description:
Soft, fluffy homemade donuts made from a simple yeast dough with milk, butter or margarine, strong white flour, caster sugar, instant yeast, and egg. The donuts are shaped, allowed to rise, and fried until golden brown. Finish them with sugar while warm or add a sweet glaze for an easy homemade glazed donut.
Preparation & Cooking Duration:
- Preparation and rising time: 2 hours 30 minutes
- Cooking time: 30 minutes
- Total time: Approximately 3 hours
- Yield: 20 donuts
Serving:
Makes approximately 20 homemade donuts.
Ingredients:
- 120 ml milk
- 60 g block margarine or butter
- 275 g strong white flour
- 40 g caster sugar
- 7 g easy bake instant yeast, usually 1 sachet
- 1 free-range egg
- Oil for frying, such as vegetable, rapeseed, or sunflower oil
Step-by-Step Instructions:
- Warm the milk and butter: Place the milk and butter or margarine in a small saucepan. Warm gently over low heat until the butter or margarine begins to melt. Remove from the heat and allow the mixture to cool slightly.
- Make the dough: Sift the strong white flour and caster sugar into a large bowl. Add the instant yeast and mix gently. Make a well in the center, then add the milk mixture and egg. Mix until a soft, slightly sticky dough forms.
- Knead thoroughly: Transfer the dough to a well-floured work surface. Using floured hands, knead for approximately 10 minutes, adding a little more flour only when required. Continue until the dough becomes smooth and stretchy.
- First rise: Place the dough in an oiled bowl. Cover with oiled cling film or a damp tea towel and leave in a draft-free place for about one hour, or until the dough has doubled in size.
- Roll and cut: Gently knock back the risen dough and knead it lightly. Roll it to approximately 1 cm thickness. Cut the donuts using a donut cutter or two round cutters of different sizes.
- Prepare for the second rise: Place each shaped donut on an individual square of greaseproof paper. Leave space between them. Cover with oiled cling film or a damp tea towel and leave somewhere draft-free for about one hour, until the donuts have puffed up to approximately twice their size.
- Heat the oil: Pour sufficient frying oil into a large saucepan and heat to 180°C or 350°F. Use a food thermometer to check the temperature accurately.
- Fry the donuts: Carefully lift each donut using its greaseproof paper and gently place it into the hot oil. Fry for approximately 90 seconds, then turn and cook the other side for another 90 seconds. Fry in small batches to prevent overcrowding.
- Drain: Once golden brown on both sides, remove the donuts with a slotted spoon. Hold them above the oil for around 10 seconds to allow excess oil to drain, then transfer them to a wire cooling rack.
- Add the topping: For sugar-coated donuts, turn the warm donuts through sugar. If using a glaze, glaze them while warm if appropriate, or allow them to cool completely before adding an icing-style topping.
Nutritional Information:
Approximate values per donut, before accounting for the variable amount of frying oil absorbed and any additional sugar or glaze:
- Calories: approximately 130–160 kcal
- Carbohydrates: approximately 17–20 g
- Protein: approximately 3–4 g
- Fat: approximately 6–8 g
- Saturated fat: approximately 2–3 g
- Sugar: approximately 2–3 g
- Sodium: approximately 70–100 mg
Notes
- Egg size: A medium UK egg is approximately equivalent to a large US egg and is suitable for this recipe.
- Flour: Strong white flour gives the donuts their soft, airy texture. Plain flour can be used if necessary, although the donuts may be slightly less light.
- Milk: Full-fat, semi-skimmed, soya, or oat milk can be used.
- Frying: Keep the oil close to 180°C (350°F) and avoid overcrowding the pan.
- Serving: Homemade donuts are best enjoyed on the day they are made.
- Storage: Keep leftovers in an airtight container at room temperature for up to 2 days.
- Freezing: Cooked, untopped donuts can be frozen for up to 3 months. Cool completely before freezing and defrost at room temperature. For the best texture, freeze before adding sugar, glaze, or fillings.
- Measurement: Using a digital scale for the flour, sugar, and other measured ingredients can provide more consistent results.