Sticky Honey Glazed Chicken: My Easy Sweet and Savory Chicken Dinner
There are some chicken recipes that are perfect for busy evenings because they don’t require a long ingredient list, complicated preparation, or hours in the kitchen. This honey glazed chicken is exactly that kind of meal. It starts with tender chicken, gives it a beautiful golden-brown sear, and finishes everything with a glossy honey, soy sauce, garlic, and vinegar glaze.
The result is juicy chicken coated in a sticky, sweet, savory, slightly tangy sauce that clings to every bite. It feels like the kind of dinner you might order at a restaurant, but it is surprisingly simple to make at home.
What I particularly love about this recipe is how flexible it is. You can prepare it with chicken thighs or chicken breasts, and you can use either boneless or bone-in pieces. The stovetop method is especially convenient when you want dinner on the table quickly, while the oven or broiler can be used when you want additional caramelization on the outside.
The combination of honey, soy sauce, garlic, and a little acidity is what makes this chicken so addictive. Honey brings sweetness and helps create that shiny glaze. Soy sauce adds salty, deeply savory flavor. Garlic gives the sauce its unmistakable aroma, while apple cider vinegar or lemon juice keeps the glaze from becoming overly sweet.
Why This Honey Chicken Belongs in Your Weeknight Dinner Rotation
A good weeknight chicken recipe should be flavorful without creating a mountain of dishes. This one checks both boxes.
The chicken is seasoned with simple pantry staples before being seared in olive oil or butter. Once it develops a golden crust, it is temporarily removed from the skillet. The same pan then becomes the foundation for the glaze.
That means the browned bits left behind from cooking the chicken become part of the sauce rather than being discarded.
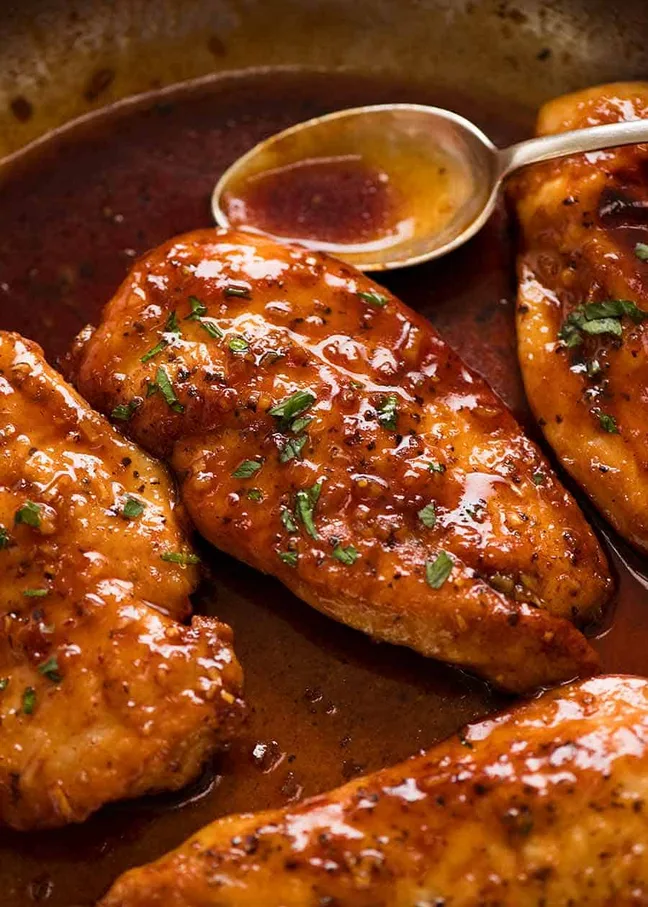
Once the honey mixture begins bubbling, the chicken goes back into the skillet. As it cooks, the sauce reduces and becomes thicker. Spoon it over the chicken several times, allowing the glaze to coat the surface. By the end, the chicken should have a beautiful glossy finish.
This is why I think of it as sticky honey chicken rather than simply chicken with sauce. The goal isn’t to serve the chicken beside a thin liquid sauce. Instead, the glaze should become concentrated enough to cling to the chicken.
The Flavor Combination That Makes It Work
The heart of this recipe is the balance between sweet, salty, tangy, and savory flavors.
Honey is naturally sweet and gives the chicken its characteristic caramelized appearance. Soy sauce provides saltiness and umami, creating a contrast with the honey. Garlic adds a warm savory note, while apple cider vinegar or lemon juice introduces acidity.
Dijon mustard is optional, but I recommend trying it if you enjoy a slightly sharper flavor. Even a small amount can make the glaze taste more complex without overpowering the honey and garlic.
Chili flakes are another optional addition. They don’t have to make the chicken extremely spicy. A small amount simply adds warmth and prevents the sweetness from dominating.
Fresh thyme or parsley can be used at the end for color and a fresh herbal finish.
Choosing the Best Chicken for This Recipe
You can make this honey garlic chicken with either thighs or breasts.
Chicken thighs are naturally rich and tend to remain juicy, making them an excellent choice for a sticky glaze. Bone-in thighs generally take longer to cook but can develop excellent flavor.
Boneless chicken breasts are convenient and cook more quickly. Because breast meat is leaner, it is important not to overcook it.
The most important thing is to consider the thickness of your chicken pieces. Cooking times are approximate because a thin boneless breast and a thick bone-in thigh will not cook at exactly the same speed.
For food safety, poultry should reach an internal temperature of 165°F (73.9°C) when checked with a food thermometer. The USDA recommends checking poultry pieces in the thickest part while avoiding contact with bone. (FSIS)
Getting the Chicken Ready for the Pan
Before cooking, pat the chicken dry with paper towels.
This small step is worth doing because excess surface moisture can interfere with browning. Once the chicken is dry, season both sides with salt and black pepper.
Don’t worry about heavily seasoning the chicken. The soy sauce in the honey glaze will contribute plenty of salty, savory flavor later.
If your chicken pieces are especially thick, you can gently flatten them to create a more even thickness. This encourages more uniform cooking.
For bone-in pieces, keep in mind that they will need more time than boneless chicken.
The Secret to Beautifully Golden Chicken
The first major cooking stage is the sear.
Place a skillet over medium-high heat and add your olive oil or butter. Once the fat is hot, carefully place the seasoned chicken into the pan.
Give the chicken enough space. If the pieces are crowded, they can release moisture and begin steaming rather than developing a proper golden crust. If necessary, cook in batches.
Sear the chicken for approximately 4 to 6 minutes per side, depending on its size and thickness.
At this stage, the chicken doesn’t necessarily need to be fully cooked. The purpose is to build color and flavor before finishing it in the glaze.
Once the chicken has developed a golden exterior, transfer it to a plate.
Do not clean the skillet.
Those browned pieces left on the bottom are flavorful and will become part of your honey garlic glaze.
Building the Sticky Honey Glaze
Turn the heat down to medium.
Now add the ingredients that create the signature sauce: honey, soy sauce, apple cider vinegar or lemon juice, and minced garlic.
If you’re using Dijon mustard and chili flakes, add them now as well.
Stir everything together directly in the skillet.
As the mixture heats, the honey begins to loosen and combine with the soy sauce. The vinegar or lemon juice adds brightness, while the garlic perfumes the entire pan.
Let the mixture gently bubble for about 1 to 2 minutes.
You aren’t trying to turn it into a very thick syrup immediately. It will continue reducing after the chicken is returned to the pan.
Keep an eye on the heat because honey can darken quickly. A moderate simmer is much easier to control than aggressive boiling.
Returning the Chicken to the Glaze
Once the sauce has started to bubble, place the chicken back into the skillet.
Turn the pieces so that both sides become coated with the glaze.
For boneless chicken, continue cooking for approximately 4 to 6 minutes.
For bone-in chicken, allow approximately 8 to 12 minutes, depending on the size of the pieces.
These are guidelines rather than guarantees. The safest way to determine whether chicken is finished is with an instant-read thermometer. Poultry should reach 165°F (73.9°C) internally. (Ask USDA)
As the chicken cooks, spoon the sauce over the top repeatedly.
This basting step is important because it helps create the glossy coating that makes this dish so appealing.
Flip the chicken once during the finishing stage and continue spooning the reduced glaze over it.
How to Tell When the Sauce Is Ready
The glaze should become noticeably thicker as it reduces.
When you drag a spoon through the sauce, it should coat the back of the spoon rather than behaving like a thin liquid.
Remember that the glaze will continue to thicken slightly as it cools, so you don’t need to reduce it until it becomes extremely thick in the skillet.
If it becomes too thick before the chicken is finished, lower the heat and add a very small splash of water to loosen it.
If the sauce is still too thin near the end, simply allow it to simmer for another minute or two while keeping a close eye on it.
Because honey contains natural sugars, high heat can cause the glaze to burn. Gentle reduction gives you much more control.
Getting Extra Caramelization
If you want your sticky honey glazed chicken to have an especially dark, caramelized exterior, you can finish it under the broiler for a short time.
Once the chicken is completely cooked, place it under a hot broiler for approximately 2 to 3 minutes.
Watch it carefully.
Honey can go from beautifully caramelized to burnt surprisingly quickly. Stay nearby and remove the chicken as soon as the surface reaches the color you want.
This finishing method is especially useful when you’re preparing the chicken in an oven-safe skillet.
A Simple Optional Citrus Twist
The basic recipe already uses apple cider vinegar or lemon juice, but you can take the citrus flavor a little further if you enjoy a brighter glaze.
A small splash of fresh orange juice can work beautifully with honey, garlic, and soy sauce. Orange brings a naturally sweet citrus aroma and can give the finished chicken a slightly different character.
This is an optional variation rather than a required ingredient, so the original ingredient quantities remain unchanged.
For a more herbal profile, fresh thyme can be added to the finished dish. Parsley is another easy garnish that gives the plate a fresh appearance.
Why Garlic Makes This Chicken So Good
Fresh garlic is one of the most important flavor ingredients in this recipe.
Three minced cloves are enough to give the glaze a noticeable garlic character without overpowering the sweetness of the honey.
Because the garlic cooks directly in the sauce, it becomes softer and more aromatic. It also mixes with the browned bits from the chicken, creating a richer flavor than simply pouring a prepared sauce over cooked chicken.
If you love garlic, you can finely mince it so that it distributes throughout the glaze.
Honey Glazed Chicken Without Making It Too Sweet
One concern people sometimes have with honey chicken is excessive sweetness.
The solution is balance.
The soy sauce supplies saltiness and umami. Apple cider vinegar or lemon juice supplies acidity. Garlic adds savory depth. These flavors keep the honey from tasting like a dessert coating.
Dijon mustard can provide another layer of sharpness, while chili flakes add gentle heat.
That’s why I recommend tasting the glaze as it cooks. If you want more brightness, lemon juice is a good choice. If you want more heat, add a small pinch of chili flakes. If you want a richer sweet-savory profile, allow the honey mixture to reduce a little longer.
Stovetop Method vs. Oven Finish
The stovetop method is the quickest option and gives you plenty of control over the glaze.
It is particularly convenient for boneless chicken breasts or thighs because you can watch the sauce reduce while the chicken finishes cooking.
The oven can be useful when you’re working with thicker or bone-in pieces. You can sear the chicken first and then finish it in an oven-safe skillet, continuing to baste it with the honey glaze.
Whichever method you choose, don’t rely exclusively on cooking time. Chicken pieces vary in thickness, so a thermometer provides a much more reliable indication of doneness. USDA guidance recommends 165°F (73.9°C) for poultry. (FSIS)
What to Serve With Sticky Honey Chicken
This sweet and savory chicken pairs easily with simple side dishes.
For a classic dinner, serve it with steamed white rice or fluffy basmati rice. The rice is especially useful because it can soak up the extra honey-soy glaze.
Mashed potatoes also work well if you want a comforting meal.
For something lighter, pair the chicken with steamed broccoli, green beans, roasted vegetables, or a crisp cucumber salad.
You can also serve it alongside stir-fried vegetables for a complete Asian-inspired dinner.
If you’re preparing the meal for guests, arrange the chicken on a serving platter, spoon the extra glaze over the top, and finish with fresh parsley or thyme.
How to Make the Chicken Look Restaurant-Worthy
Presentation is surprisingly easy with this recipe.
After the chicken has finished cooking, allow it to sit briefly before plating. Then spoon some of the remaining glaze over each piece.
The sauce should look shiny and concentrated.
Add a few fresh herbs for color. If you like a little heat, a tiny sprinkling of chili flakes can make the dish look even more inviting.
For a complete plate, place the chicken beside rice and a green vegetable. The contrast between the golden-brown chicken, white rice, and fresh greens makes the meal visually appealing without requiring complicated garnishes.
Common Mistakes to Avoid
One mistake is starting with wet chicken. Patting the chicken dry helps encourage browning.
Another is using extremely high heat after adding the honey. The glaze contains sugar and can burn quickly. Medium heat is much easier to manage.
Avoid overcrowding the skillet during the searing stage. If your pan isn’t large enough for all four pieces, work in batches.
It’s also important not to judge doneness solely by the outside color. A deeply browned chicken breast isn’t necessarily cooked through, and a pale-looking piece isn’t necessarily raw. Use a food thermometer to check the thickest portion.
Finally, don’t reduce the sauce too aggressively. The goal is a thick, glossy glaze—not burnt sugar.
Make-Ahead and Leftover Tips
This chicken is best served immediately while the glaze is glossy, but leftovers can still make an excellent next-day lunch.
Transfer cooked chicken to a suitable container and refrigerate it promptly. USDA guidance recommends refrigerating perishable leftovers within two hours and reheating leftovers to 165°F.
For reheating, use a skillet over low to medium heat and add a small splash of water if the glaze has become very thick.
You can also slice leftover chicken and serve it over rice, noodles, salad, or steamed vegetables.
My Favorite Way to Serve It
Personally, I like serving this honey garlic chicken over warm rice with a simple vegetable on the side.
The rice absorbs the sweet-savory sauce, while the vegetable adds freshness and contrast.
If I want extra flavor, I finish the chicken with fresh parsley or thyme and a few chili flakes.
For a brighter variation, orange juice can be introduced as an optional flavor twist. The combination of citrus, honey, garlic, and soy sauce works particularly well when you want something slightly different from the original glaze.
This Easy Chicken Dinner
This recipe proves that an impressive dinner doesn’t need to be complicated.
With just a handful of familiar ingredients, you can turn ordinary chicken into a glossy, flavorful meal with a beautiful balance of sweetness, saltiness, acidity, garlic, and optional heat.
The key is the cooking sequence: season the chicken, sear it until golden, build the glaze in the same skillet, return the chicken to the pan, and keep basting until the sauce becomes thick and sticky.
That simple process creates layers of flavor without requiring a long marinade or complicated preparation.
Whether you’re cooking honey glazed chicken thighs, boneless chicken breasts, or bone-in pieces, this recipe is flexible enough for a casual family dinner and flavorful enough to serve when you’re entertaining.
And once you’ve made it a few times, you can easily customize the finishing touches to suit your taste. Keep it classic with honey, soy sauce, garlic, and lemon. Add Dijon mustard for extra depth. Use chili flakes for heat. Try orange juice for a citrus variation. Finish with fresh herbs for a bright, fresh touch.
The result is a comforting sweet and savory chicken dinner with a sticky glaze that makes every bite flavorful.
Food-safety note: Always verify that chicken reaches an internal temperature of 165°F (73.9°C) using a food thermometer. (FSIS)
Source: The ingredient and cooking concept supplied in the original recipe prompt was used as the basis for this rewritten version. General poultry safety guidance was cross-checked with the USDA Food Safety and Inspection Service
Honey Glazed Chicken
Ingredients
4 chicken thighs or breasts, boneless or bone-in
Salt and black pepper, as needed
1 tbsp olive oil or butter
⅓ cup honey
3 tbsp soy sauce, preferably low-sodium
2 tbsp apple cider vinegar or lemon juice
3 cloves garlic, minced
1 tsp Dijon mustard, optional
½ tsp chili flakes, optional
Fresh thyme or parsley, for garnish
Quick Method
1. Season the chicken
Pat the chicken dry, then season both sides with salt and black pepper.
2. Brown the chicken
Heat olive oil or butter in a skillet over medium-high heat. Sear chicken for about 4–6 minutes per side until nicely golden. Remove from the pan.
3. Mix the glaze
Reduce the heat to medium. Add honey, soy sauce, apple cider vinegar or lemon juice, garlic, Dijon mustard, and chili flakes. Stir and let the mixture gently bubble for 1–2 minutes.
4. Finish cooking
Return the chicken to the skillet and coat it generously with the glaze. Cook until completely done, turning once and basting frequently.
Boneless chicken: about 4–6 minutes
Bone-in chicken: about 8–12 minutes
Chicken should reach 165°F (74°C) internally for food safety. (FSIS)
5. Serve
Spoon the sticky glaze over the chicken and garnish with fresh thyme or parsley.
Easy Variations
For an extra-sticky glaze, reduce the sauce slightly longer at the end.
For crispy caramelized edges, broil the fully cooked chicken for 2–3 minutes while watching carefully.
For a citrusy twist, add a splash of orange juice to the glaze.
Serve with rice, roasted vegetables, broccoli, or a fresh salad.