Protein-Rich Chocolate Ice Cream Recipe – Creamy, Healthy & Easy Homemade Frozen Dessert
The Ultimate Guide to Homemade Protein Chocolate Ice Cream
Enjoy Rich Chocolate Ice Cream with a Healthy Protein Boost
Chocolate ice cream has always been one of the world’s favorite frozen desserts. Its rich cocoa flavor, creamy texture, and refreshing taste make it a timeless treat for both kids and adults. While traditional chocolate ice cream is delicious, it often contains large amounts of sugar and offers very little nutritional value. Fortunately, you can enjoy the same indulgent experience while adding valuable protein to your diet.
This homemade Protein Chocolate Ice Cream combines the luxurious taste of classic chocolate ice cream with the nutritional benefits of collagen protein powder. Every serving delivers a satisfying balance of creamy texture, chocolate flavor, and extra protein, making it an excellent dessert for active lifestyles, fitness enthusiasts, or anyone looking for healthier dessert options.
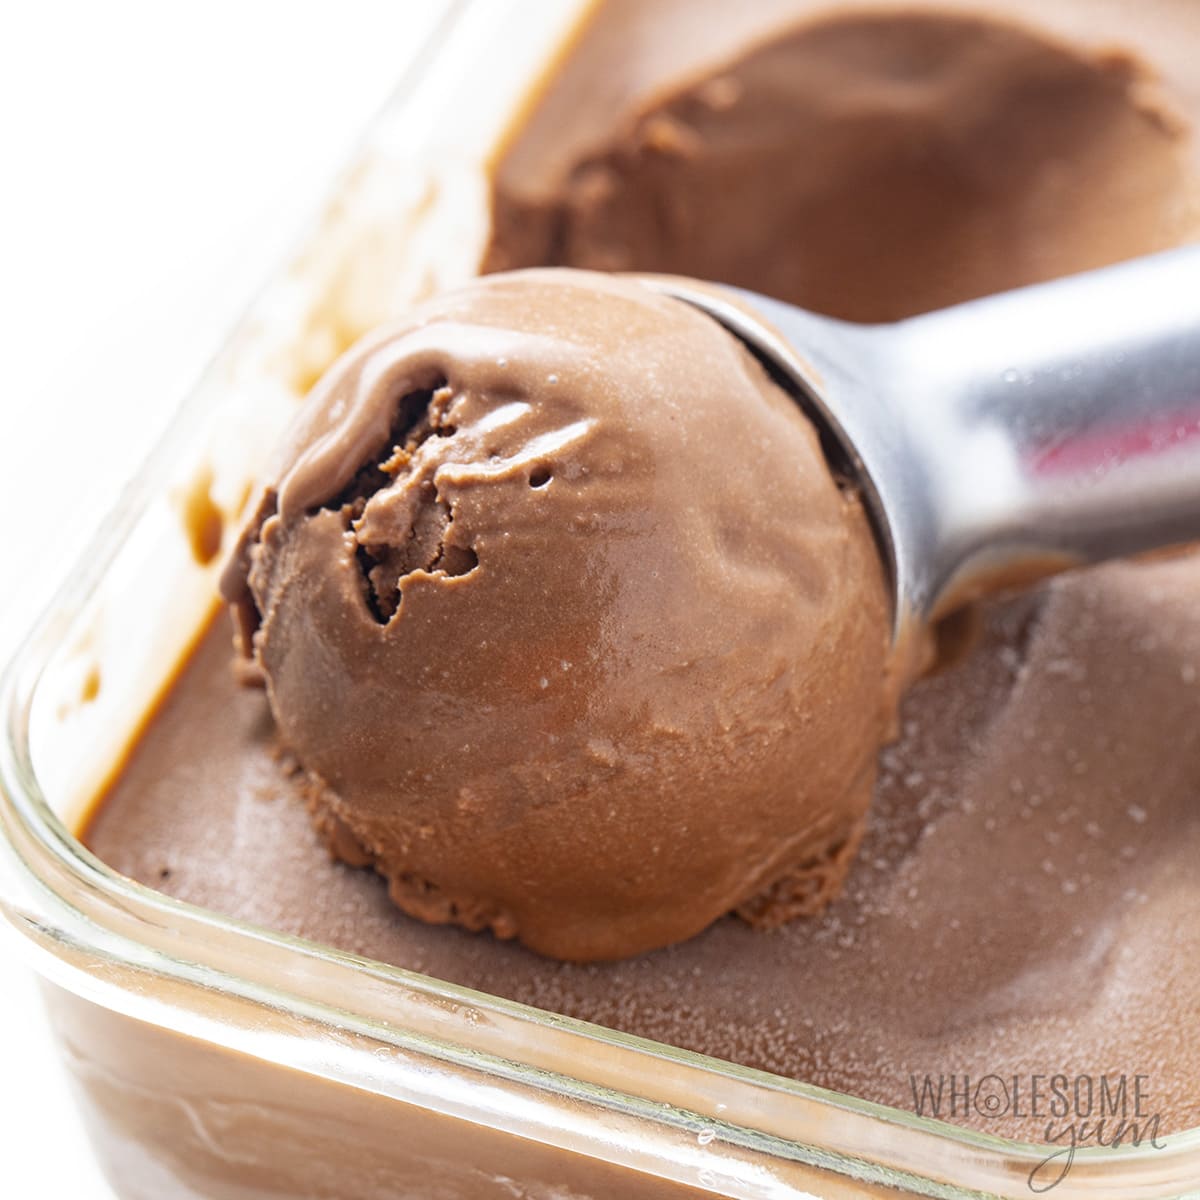
Unlike many commercial high-protein frozen desserts that can have an artificial taste or icy consistency, this homemade version creates a smooth custard base using egg yolks, heavy cream, cocoa powder, almond milk, and protein powder. The result is a scoopable, silky, and deeply chocolatey ice cream that feels every bit as indulgent as premium ice cream.
Whether you’re preparing dessert for your family or meal-prepping healthy treats for the week, this recipe is simple enough for beginners while delivering professional-quality results.
Why You’ll Love This Homemade Protein Ice Cream
This recipe offers far more than just delicious flavor. It combines wholesome ingredients with a traditional custard method to create exceptional texture and nutrition.
Some reasons you’ll love making this recipe include:
Rich chocolate flavor
High protein content
Smooth and creamy texture
Lower sugar than traditional recipes
Easy to customize
Great for meal prep
Naturally satisfying
Perfect for post-workout desserts
Family-friendly recipe
Free from unnecessary preservatives
Homemade frozen desserts also allow complete control over ingredient quality, sweetness, and flavor intensity.
What Makes Protein Ice Cream Different
Traditional ice cream focuses mainly on cream, milk, sugar, and flavorings. Protein ice cream includes additional protein sources that increase nutritional value without sacrificing taste.
Adding collagen protein powder gives this recipe several advantages:
Supports daily protein intake
Blends smoothly without gritty texture
Doesn’t overpower chocolate flavor
Helps create a creamy consistency
Works well in frozen desserts
Collagen protein is especially popular because it dissolves easily into warm liquids while maintaining a silky finish.
Benefits of Homemade Chocolate Protein Ice Cream
Preparing frozen desserts at home gives you complete control over every ingredient.
Benefits include:
Higher Protein
Protein helps support muscle recovery, promotes fullness, and contributes to overall wellness.
Better Ingredient Quality
You can choose premium cocoa powder, fresh dairy products, and quality protein powder.
Lower Added Sugar
Using monk fruit and allulose sweetener reduces added sugar while maintaining sweetness.
Fresh Homemade Taste
Fresh ingredients create a richer, cleaner chocolate flavor than many store-bought alternatives.
Customizable
You can personalize the recipe with your favorite toppings and mix-ins after churning.
Understanding Each Ingredient
Every ingredient plays an important role in creating creamy, flavorful protein ice cream.
Egg Yolks
Egg yolks form the heart of the custard base.
They help:
Create smooth texture
Prevent icy crystals
Add richness
Naturally emulsify fats and liquids
Produce luxurious mouthfeel
Using fresh large egg yolks provides the best consistency.
Powdered Monk Fruit Allulose Blend
This sweetener delivers sweetness with fewer carbohydrates than regular sugar.
Benefits include:
Smooth sweetness
Excellent freezing properties
No overpowering aftertaste
Lower sugar content
Suitable for many low-carb lifestyles
Sea Salt
Although only a small amount is used, sea salt dramatically improves flavor.
It helps:
Balance sweetness
Enhance cocoa notes
Increase overall depth of flavor
Unsweetened Vanilla Almond Milk
Almond milk lightens the custard while adding subtle vanilla flavor.
It also helps reduce the overall calorie content compared to using all heavy cream.
Heavy Cream
Heavy cream provides the luxurious richness expected from premium ice cream.
It contributes:
Creamy texture
Smooth consistency
Rich flavor
Better freezing quality
Dutch-Processed Cocoa Powder
Dutch-process cocoa creates deep chocolate flavor with a darker color and smoother finish.
Its lower acidity produces a more balanced chocolate taste.
Choose high-quality cocoa powder whenever possible for the richest results.
Collagen Protein Powder
Collagen protein blends easily into the warm custard.
It offers:
Extra protein
Smooth texture
Neutral flavor
Easy digestion
Convenient nutrition
You may substitute another unsweetened protein powder if preferred while keeping the ingredient quantity the same.
How the Custard Method Creates Better Ice Cream
The secret behind premium ice cream lies in the custard.
Unlike quick no-churn recipes, cooked custard develops:
Richer flavor
Creamier texture
Better stability
Smaller ice crystals
Improved scoopability
Slow cooking allows proteins and fats to combine into a silky base that churns beautifully.
Step-by-Step Preparation Guide
Step 1: Whisk the Egg Mixture
Place the egg yolks, powdered sweetener, and sea salt into a mixing bowl.
Whisk until the mixture becomes pale, smooth, and slightly thickened.
This step incorporates air while dissolving the sweetener.
Step 2: Heat the Dairy Base
Combine:
Almond milk
Heavy cream
Cocoa powder
Protein powder
Whisk thoroughly until the cocoa dissolves completely.
Heat gently over medium heat until small bubbles appear around the edges.
Do not allow the mixture to boil.
Step 3: Temper the Eggs Carefully
Tempering prevents scrambled eggs.
Slowly pour a small amount of the hot chocolate mixture into the egg yolks while whisking constantly.
Continue adding the remaining hot mixture gradually until fully combined.
Step 4: Cook the Custard
Return everything to the saucepan.
Cook over low heat while stirring continuously using a spatula or wooden spoon.
The custard is ready when it reaches approximately 170°F (76°C) and coats the back of a spoon.
Avoid overheating.
Step 5: Chill Thoroughly
Transfer the cooked custard into a clean bowl.
Cover the surface directly with plastic wrap to prevent a skin from forming.
Refrigerate for at least four hours or overnight.
A properly chilled base churns into much smoother ice cream.
Step 6: Churn Until Creamy
Pour the cold custard into your frozen ice cream maker bowl.
Churn according to your machine’s instructions, usually about 20 to 25 minutes.
The finished consistency resembles soft-serve ice cream.
Step 7: Freeze Until Firm
For firmer scoops, transfer the churned ice cream into a freezer-safe container.
Freeze several hours before serving.
Expert Tips for the Best Protein Chocolate Ice Cream
Always use fresh egg yolks.
Choose premium Dutch-process cocoa.
Fully chill the custard before churning.
Stir constantly while cooking.
Avoid overheating the eggs.
Freeze the ice cream maker bowl completely.
Store in an airtight container.
Allow frozen ice cream to soften for several minutes before scooping.
Delicious Topping Ideas
Take your homemade dessert to the next level with toppings such as:
Fresh strawberries
Raspberries
Blueberries
Chopped almonds
Pecans
Walnuts
Hazelnuts
Dark chocolate curls
Unsweetened coconut flakes
Cocoa nibs
Sugar-free chocolate syrup
Whipped cream
Storage Tips
Store the finished ice cream in an airtight freezer container.
For the best texture:
Freeze up to two weeks.
Cover the surface with parchment paper before sealing.
Let stand at room temperature for 5–10 minutes before serving.
Frequently Asked Questions
Can I use another protein powder?
Yes. Any unsweetened protein powder may replace collagen protein powder while keeping the same measurement.
Can I make it sweeter?
You may adjust the sweetener slightly according to personal taste.
Can I skip the ice cream maker?
An ice cream maker produces the smoothest texture, but you can freeze the mixture and stir every 30–45 minutes until creamy.
Why is chilling important?
Cold custard freezes faster, creating smaller ice crystals and a creamier final texture.
This Protein Chocolate Ice Cream proves that healthy desserts can be every bit as satisfying as traditional recipes. The rich cocoa flavor, silky custard texture, and added protein create a frozen dessert that’s perfect for everyday enjoyment, post-workout treats, or special occasions.
By using simple ingredients and a classic custard method, you’ll create a homemade chocolate ice cream that’s creamy, flavorful, and packed with nutrition. Once you’ve tried this recipe, it’s likely to become one of your favorite homemade frozen desserts.
Easy Protein Chocolate Ice Cream Recipe
Prep Time: 5 minutes
Cook Time: 30 minutes
Chilling Time: 4 hours
Total Time: 4 hours 35 minutes
Servings: 6
Ingredients
5 large egg yolks
½ cup Besti Powdered Monk Fruit Allulose Blend
1 pinch sea salt
1½ cups unsweetened vanilla almond milk
1 cup heavy cream
¼ cup Dutch-process cocoa powder
¼ cup collagen protein powder (or any unsweetened protein powder)
Instructions
In a medium mixing bowl, whisk together the egg yolks, powdered monk fruit allulose sweetener, and sea salt until the mixture becomes pale and creamy.
In a saucepan, combine the almond milk, heavy cream, Dutch-process cocoa powder, and collagen protein powder. Whisk until smooth and heat over medium heat until it just begins to simmer.
Slowly pour the hot chocolate mixture into the egg yolk mixture while whisking constantly to temper the eggs.
Pour everything back into the saucepan and cook over low heat, stirring continuously until the custard reaches 170°F (76°C) and lightly coats the back of a spoon.
Transfer the custard to a bowl, cover the surface with plastic wrap, and refrigerate for at least 4 hours or until completely chilled.
Pour the chilled mixture into a frozen ice cream maker bowl and churn for 20–25 minutes until it reaches a soft-serve consistency.
Serve immediately for a soft texture or transfer to a freezer-safe container and freeze for several hours for firmer scoops.
Enjoy your rich, creamy, high-protein homemade chocolate ice cream!