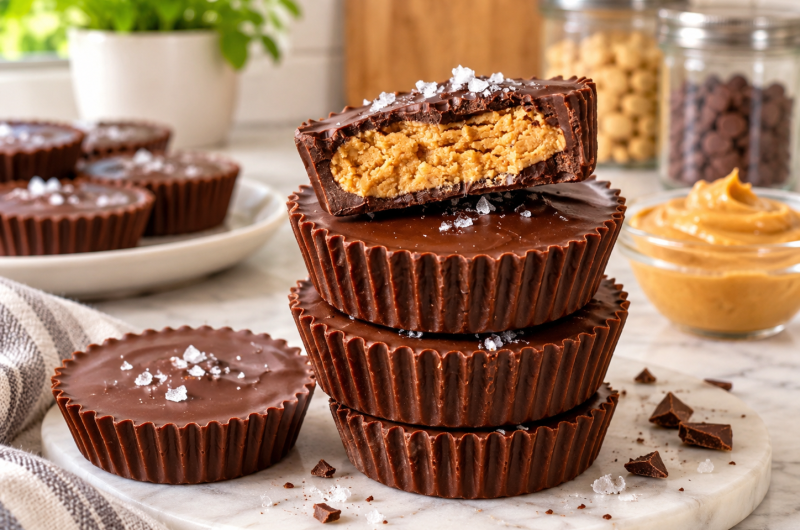
If you love the combination of creamy peanut butter and rich chocolate, these High Protein Peanut Butter Cups are a delicious homemade treat worth adding to your snack collection. They bring together two classic flavors in a simple recipe that requires minimal preparation and only a handful of everyday ingredients.
With the addition of vanilla protein powder, these homemade peanut butter cups offer more protein than many traditional chocolate peanut butter candies, making them a satisfying option when you want something sweet.
These homemade Peanut Butter Protein Cups are inspired by the popular chocolate peanut butter cups found in stores but are prepared with ingredients you can easily control. The filling has a smooth, creamy texture with a pleasant peanut butter flavor, while the chocolate coating creates a delicious outer layer.
A little coconut oil helps the chocolate melt smoothly, and a touch of maple syrup adds sweetness to the protein filling. The result is a freezer-friendly dessert that tastes indulgent while offering some additional nutritional value.
One of the best things about this High Protein Peanut Butter Cups Recipe is how straightforward it is. You do not need baking skills, complicated equipment, or a long list of ingredients. The peanut butter filling is mixed in one bowl, the chocolate is melted separately, and everything is assembled in a muffin pan. After a short time in the freezer, the chocolate becomes firm, and the cups are ready to enjoy.
Why You Will Love These Peanut Butter Protein Cups
There are several reasons why these homemade chocolate peanut butter protein cups are such a useful recipe. First, they are easy to prepare, making them suitable for busy weekdays when you want a homemade snack without spending hours in the kitchen. The preparation involves only a few simple steps, and most of the setting time happens in the freezer. This makes the recipe convenient for beginners and experienced home cooks alike.
Another reason to enjoy these protein peanut butter cups is their combination of flavors and textures. The chocolate coating provides a satisfying snap when chilled, while the peanut butter center stays soft and creamy. Vanilla protein powder blends into the filling, adding protein while complementing the natural nutty taste. Every bite delivers a balance of chocolate richness and peanut butter sweetness without requiring traditional candy-making techniques.
These treats are also excellent for meal preparation. You can prepare a batch in advance, store the cups in an airtight container, and enjoy them whenever you want a convenient sweet snack. Keeping a few in the refrigerator makes them easy to grab after lunch or dinner, while frozen portions provide a longer-lasting supply. Because the recipe makes twelve individual cups, it is also simple to divide them into portions.
What Makes These Homemade Peanut Butter Cups Different?
Traditional peanut butter cups are generally made with chocolate and a sweet peanut butter filling. This homemade version adds vanilla protein powder to the center, giving the recipe a nutritional advantage over many conventional candy options. Although these treats still contain chocolate, peanut butter, and natural sweetener, the added protein makes them a more filling dessert choice for people looking to include more protein in their daily eating routine.
The ingredient combination also gives you more flexibility over the final result. You can choose plant-based or whey protein powder depending on your dietary preferences. Similarly, selecting dairy-free chocolate chips makes it possible to prepare a version without dairy ingredients. Using natural creamy peanut butter creates a rich filling, while dark or semisweet chocolate helps balance the sweetness.
Unlike baked protein desserts, these chocolate peanut butter cups do not need an oven. The chocolate is melted gently in the microwave, and the assembled cups are chilled until firm. This no-bake preparation keeps the process simple and makes the recipe especially useful during warmer months when you may prefer not to heat the kitchen.
How to Make High Protein Peanut Butter Cups
Step 1: Prepare the Peanut Butter Filling
Begin by placing the natural creamy peanut butter into a small microwave-safe bowl. Microwave it for approximately 20 to 30 seconds, or until it becomes slightly runny. Warming the peanut butter makes it easier to combine with the protein powder and maple syrup. Avoid heating it for too long, as you only need a softer consistency rather than hot peanut butter.
Add the vanilla protein powder and pure maple syrup to the warmed peanut butter. Stir everything together until the mixture is evenly combined. Continue mixing until the protein powder is incorporated and there are no obvious dry patches. The filling should be thick enough to hold its shape but soft enough to divide into small portions.
Step 2: Shape the Peanut Butter Discs
Use a one-tablespoon cookie scoop to divide the peanut butter mixture into twelve equal portions. Place each portion on a plate and gently flatten it into a small disc. Aim for a diameter of approximately one and a half inches so that each disc fits neatly inside the muffin pan.
Try to keep the discs similar in size and thickness. Even portions help ensure that every peanut butter cup contains a balanced amount of filling. Once all twelve discs have been shaped, set them aside while you prepare the melted chocolate. Keeping them ready before assembling the cups makes the next steps quicker and easier.
Step 3: Melt the Chocolate and Coconut Oil
Place the semisweet or dark chocolate chips into a small microwave-safe bowl. Add the coconut oil and microwave the mixture in 30-second intervals. After each interval, remove the bowl and stir the chocolate thoroughly. Continue until the chocolate is fully melted and has a smooth, pourable consistency.
Be careful not to overheat the chocolate because excessive heat can cause it to burn or become difficult to work with. Short microwave intervals provide better control and allow the chocolate to melt gradually. Once smooth, the mixture is ready to be used for the chocolate layers.
Step 4: Add the First Chocolate Layer
Prepare a twelve-cup silicone muffin pan or a metal muffin pan fitted with paper liners. Spoon a scant tablespoon of melted chocolate into each muffin well. Use the back of a spoon to spread the chocolate across the bottom of each cup, creating an even base layer.
Try to distribute the chocolate consistently so that each cup has enough coating to support the peanut butter filling. The first layer is important because it forms the bottom of the finished treat. Taking a little extra care during this step helps prevent the filling from sticking directly to the pan.
Step 5: Add the Peanut Butter Filling
Place one prepared peanut butter disc into the center of each chocolate-coated muffin well. Position each disc gently so that it sits on the chocolate base. Avoid pressing too firmly, as this could push the filling through the bottom layer or cause the chocolate to spread unevenly.
Centering the filling helps create the familiar appearance of traditional peanut butter cups. It also leaves enough room around the edges for the final chocolate layer to cover the filling completely. Repeat this process until all twelve muffin wells contain one peanut butter disc.
Step 6: Cover with the Remaining Chocolate
Spoon approximately one additional tablespoon of melted chocolate over each peanut butter disc. Use the back of a spoon to gently spread the chocolate until the filling is covered. Make sure the chocolate reaches the edges of each muffin well so that the peanut butter center is enclosed.
A gentle swirling motion can help create an even surface. You do not need to make the tops perfectly smooth, but try to cover any exposed peanut butter. This final chocolate layer gives each cup its complete candy-like appearance and helps hold the filling in place once the chocolate becomes firm.
Step 7: Add Sea Salt and Freeze
If desired, sprinkle a small amount of flaky sea salt over the chocolate tops. Add the salt while the chocolate is still melted so that it sticks properly. The salt is optional, but it adds a pleasant finishing touch and creates a delicious contrast with the sweet peanut butter center.
Transfer the muffin pan to the freezer and allow the cups to chill for at least 15 minutes, or until the chocolate has completely set. The exact setting time may vary depending on your freezer and the thickness of the chocolate layers. Once firm, the peanut butter cups are ready to remove from the pan.
Step 8: Remove and Store
Carefully remove each peanut butter cup from the silicone muffin pan. If you used a metal pan with paper liners, simply lift the cups out using the paper edges. Handle them gently to avoid cracking the chocolate coating, particularly if the cups are very cold.
Place the finished treats into an airtight storage container. They can be kept in the refrigerator for up to five days or stored in the freezer for up to three months. Keeping them properly covered helps preserve their flavor and prevents them from absorbing unwanted odors from other foods.
Are High Protein Peanut Butter Cups Healthy?
Homemade High Protein Peanut Butter Cups can be a more protein-focused alternative to conventional peanut butter candy. Adding vanilla protein powder increases the protein content of the filling, while peanut butter provides fat and some additional protein. The recipe also uses maple syrup for sweetness and allows you to choose the type of chocolate that suits your preferences.
However, these treats should still be enjoyed in reasonable portions. Peanut butter, chocolate chips, and coconut oil are energy-dense ingredients, so the cups are not automatically low-calorie simply because they contain protein. Their nutritional value depends on the specific brands and quantities used. They are best considered a satisfying homemade snack or dessert rather than a replacement for a balanced meal.
You can make informed ingredient choices based on your nutritional goals. For example, choosing dark chocolate or vegan chocolate chips may help accommodate particular preferences, while a suitable protein powder can increase the protein contribution of each serving. Always check the nutritional information on individual product labels when calculating your daily intake.
Can You Make Peanut Butter Protein Cups Ahead of Time?
Yes, these homemade chocolate peanut butter cups are excellent for preparing in advance. Since they need to be frozen to set, you can easily make them several hours before serving. Preparing a complete batch ahead of time is also useful when you want a convenient homemade dessert available throughout the week.
Once the chocolate has set, transfer the cups into an airtight container and refrigerate them for up to five days. If you want to keep them for longer, freeze them for up to three months. This makes the recipe especially practical for meal preparation because you can prepare twelve portions at once without having to repeat the process every day.
For the best texture, allow frozen cups to soften slightly before eating if you prefer a creamier center. You can also enjoy them directly from the refrigerator for a firmer chocolate coating and softer peanut butter filling. Keeping them covered between servings helps maintain their freshness.
Frequently Asked Questions
Are High Protein Peanut Butter Cups Suitable for a Keto Diet?
Although these homemade peanut butter cups contain protein and can offer more fiber and less sugar than some traditional store-bought versions, the standard recipe is not necessarily suitable for a strict ketogenic diet. Maple syrup and regular chocolate chips contribute carbohydrates, while peanut butter also contains some naturally occurring carbohydrates.
If you want a lower-carbohydrate version, you can consider replacing the maple syrup with a suitable sugar-free liquid sweetener and selecting sugar-free chocolate chips. You should also check the carbohydrate content of your protein powder and peanut butter. The final nutritional values will depend on the products and quantities used.
Can I Make Peanut Butter Protein Cups Without Peanut Butter?
Yes. You can replace the peanut butter with another nut butter or seed butter if you prefer a different flavor or need to avoid peanuts. Almond butter and cashew butter are suitable alternatives, while sunflower seed butter provides a nut-free option.
Keep in mind that different nut and seed butters can have different consistencies. Some are thicker or more oily than natural creamy peanut butter, which may slightly change the texture of the filling. Choose a smooth variety and stir it well before measuring to help achieve an even mixture.
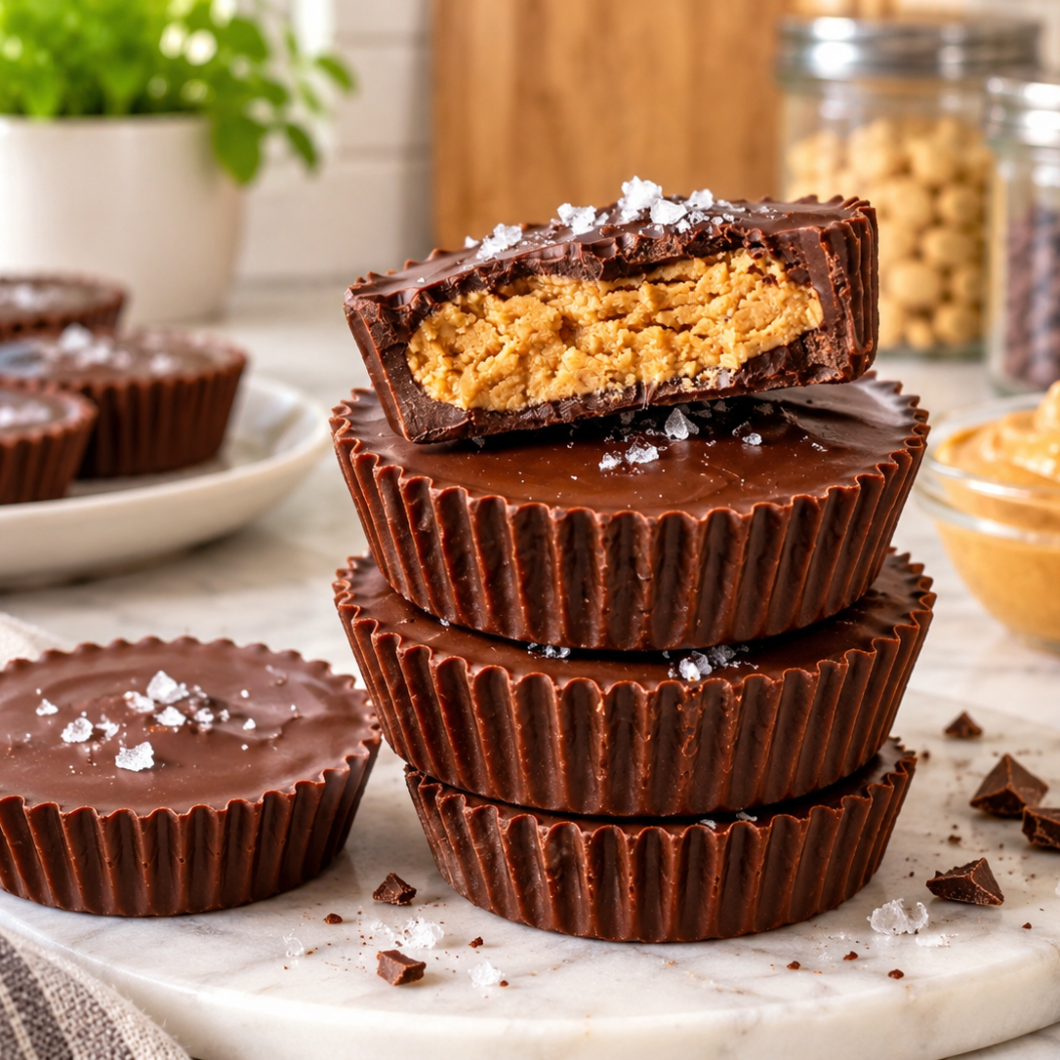
High protein peanut butter cup treats
 Recipe by admin
These easy High Protein Peanut Butter Cups feature a creamy vanilla protein and peanut butter filling covered with rich semisweet or dark chocolate.
12
servings15
minutes10
minutes240
kcal25
minutesIngredients
⅔ cup natural creamy peanut butter
⅓ cup vanilla protein powder (30 g), plant-based or whey protein powder
2 tablespoons pure maple syrup
1 (10 ounce) bag semisweet or dark chocolate chips, use vegan chocolate chips for dairy free
2 teaspoons coconut oil
Flaky sea salt, optional
Directions
- Warm the peanut butter: Place the natural creamy peanut butter in a small microwave-safe bowl. Microwave for 20–30 seconds until it reaches a runny consistency.
- Prepare the filling: Add the vanilla protein powder and maple syrup to the warmed peanut butter. Stir until everything is thoroughly combined.
- Shape the filling: Using a one-tablespoon cookie scoop, divide the mixture into 12 portions. Flatten each portion into a small disc approximately 1½ inches in diameter. Place the discs on a plate and set aside.
- Melt the chocolate: Combine the chocolate chips and coconut oil in a small microwave-safe bowl. Microwave in 30-second intervals, stirring between each interval until completely melted and smooth. Avoid overheating.
- Create the chocolate bases: Spoon a scant one tablespoon of melted chocolate into each cup of a 12-cup silicone muffin pan or a metal muffin pan fitted with paper liners. Spread evenly across the bottom using the back of a spoon.
- Add the filling: Place one peanut butter disc in the center of each chocolate-coated muffin well.
- Cover with chocolate: Add another tablespoon of melted chocolate over each peanut butter disc. Gently spread with the back of a spoon until the filling is completely covered.
- Add sea salt: Sprinkle the tops with flaky sea salt if desired.
- Freeze until firm: Place the muffin pan in the freezer for at least 15 minutes, or until the chocolate has completely set.
- Remove and store: Carefully remove the peanut butter cups from the pan. Transfer them to an airtight container and refrigerate for up to five days or freeze for up to three months.
Notes
- Any brand of vanilla protein powder can be used, whether plant-based or whey.
- Natural creamy peanut butter is recommended for a smooth filling.
- Use vegan chocolate chips for a dairy-free chocolate option.
- Almond butter, cashew butter, or sunflower seed butter can replace peanut butter.
- For a lower-carbohydrate variation, consider sugar-free liquid sweetener and sugar-free chocolate chips.
- A silicone muffin pan makes removal easier, but paper muffin liners in a regular metal pan work too.
- Melt chocolate slowly in short microwave intervals to prevent burning.
- Flaky sea salt is optional but adds a pleasant sweet-and-salty finish.
Nutrition Facts
- Total number of serves: 12
- Calories: 240kcal
- Fat: 16g
- Carbohydrates: 18g
- Net Carbs: 15g
- Fiber: 3g
- Sugar: 12g
- Protein: 7g