Homemade Fried Bannock Recipe – Crispy, Golden, and Soft Inside
Easy Fried Bannock You Can Make at Home
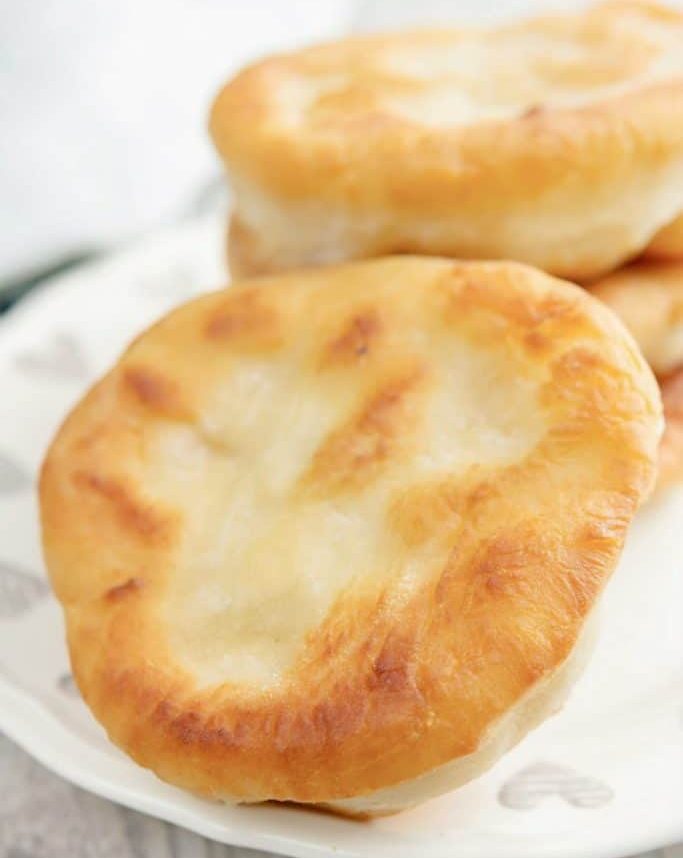
If you are looking for a simple homemade bread that requires only a handful of everyday ingredients, this Fried Bannock Recipe is a wonderful choice. Bannock is a versatile quick bread that can be prepared in several ways, including frying, baking, cooking on a griddle, or preparing it over an open fire. This fried version develops a beautifully golden exterior while staying soft, tender, and fluffy in the center.
What makes homemade bannock especially appealing is how uncomplicated the dough is. You do not need yeast, a long rising time, or complicated baking equipment. Instead, the dough comes together with all-purpose flour, baking powder, salt, an optional touch of sugar, fat, and warm water or milk. Once the dough is gently mixed and shaped, it is ready to cook.
Bannock has a long history in Canada and has been prepared in different forms by Indigenous communities as well as in Métis and Canadian food traditions. There is no single universal bannock recipe because ingredients, cooking methods, textures, and shapes vary considerably by region and family tradition. Historical sources also document bannock being prepared as a practical food because its basic ingredients were easy to carry and store.
This particular recipe is designed as an easy fried bannock bread that works equally well as a sweet or savory food. You can serve it warm with butter and honey in the morning, pair it with soup or stew at dinner, or simply enjoy a piece fresh from the skillet.
Why This Simple Bannock Recipe Works
One of the best things about this recipe is that it focuses on straightforward ingredients and a gentle preparation method. Baking powder provides the lift, while the fat contributes richness and tenderness. The warm liquid brings everything together into a soft dough.
The dough should not be heavily kneaded. That is an important part of making tender bannock. Once the flour has absorbed enough liquid to form a soft dough, only a few gentle kneading motions are necessary.
Overworking the dough can result in a tougher finished bread. For that reason, think of bannock as a quick bread rather than a yeast bread that requires extensive kneading.
Another advantage is its flexibility. The optional sugar can be included when you want a slightly sweeter bannock, or left out when you plan to serve it with savory foods. Similarly, you can use water or milk depending on what you have available.
What You Need for Homemade Fried Bannock
The ingredient list is short, but every ingredient has a purpose.
All-Purpose Flour
Two cups of all-purpose flour form the foundation of the dough. This type of flour is convenient and produces a soft interior with enough structure to hold its shape during frying.
For the best results, measure your flour carefully rather than packing it tightly into the measuring cup. Too much flour can make the dough dry and difficult to work with.
Baking Powder
One tablespoon of baking powder helps the bannock puff as it cooks. Since this is a quick bread, baking powder provides the leavening that would otherwise come from yeast.
Fresh baking powder is important. If yours has been sitting in the pantry for a very long time, its lifting ability may have weakened.
Salt
The half teaspoon of salt balances the flavor of the flour and brings out the richness of the other ingredients.
Even when making a sweet-style bannock, a little salt is helpful because it prevents the finished bread from tasting flat.
Sugar
One tablespoon of sugar is optional. It gives the bannock a mild sweetness and can encourage attractive browning during frying.
If you prefer a more neutral bannock for serving alongside savory dishes, simply leave the sugar out.
Lard, Butter, or Oil
Two tablespoons of lard, butter, or oil are mixed into the dough. This adds richness and helps create a more tender texture.
The recipe also requires additional fat for frying. Choose whichever frying fat you normally use and feel comfortable cooking with.
Warm Water or Milk
You will need approximately three-quarters to one cup of warm water or milk, added gradually.
Do not pour all of the liquid in at once. Flour can absorb different amounts of liquid depending on humidity, measuring technique, and even the brand of flour. Adding the liquid slowly gives you better control over the consistency.
The goal is a soft dough that holds together without becoming excessively sticky.
How to Mix the Bannock Dough
Begin by combining the flour, baking powder, salt, and optional sugar in a large mixing bowl. Whisking the dry ingredients together first helps distribute the baking powder and salt throughout the flour.
Next, add the two tablespoons of your chosen fat. If using butter, softened butter is easiest to incorporate. Lard can be worked into the flour in the same way.
Use your fingertips, a pastry cutter, or a fork to work the fat into the dry ingredients. Continue until the mixture resembles coarse crumbs.
This step is useful because the fat becomes distributed throughout the flour instead of remaining in one concentrated area.
Now begin adding the warm water or milk. Add a little at a time while stirring gently with a fork.
Stop adding liquid as soon as the mixture comes together into a soft dough.
You are not looking for a wet batter. The mixture should be soft enough to shape but firm enough that you can handle it without it sticking heavily to your hands.
Keep the Dough Soft, Not Overworked
Once the dough forms, transfer it to a lightly floured work surface.
Knead it gently only three or four times. You are simply bringing the dough together and smoothing it slightly.
There is no need for several minutes of vigorous kneading.
This is one of the most important techniques for an easy homemade bannock recipe. Too much handling can develop the gluten in the flour and make the finished bannock chewy or tough.
If the dough feels unusually sticky, sprinkle the work surface with a small amount of flour. Avoid adding large amounts of extra flour because that can make the finished bannock heavy.
If the dough seems dry or crumbly, a tiny amount of additional warm liquid can help bring it together.
Shape Your Bannock Your Favorite Way
Once the dough is ready, pat or gently roll it until it is approximately half an inch thick.
You have several options for shaping the dough.
You can cut it into:
- Small rounds
- Wedges
- Strips
- Simple rustic pieces
There is no need for every piece to look perfectly identical. One of the charms of homemade bannock is its rustic appearance.
Smaller pieces are especially convenient when serving several people because they cook relatively quickly and are easy to share.
Try to keep the pieces reasonably similar in thickness so that they cook at approximately the same rate.
The Secret to Golden Fried Bannock
The frying stage is where the simple dough turns into crispy, golden bannock.
Heat approximately one inch of oil in a deep skillet over medium-high heat. Allow the oil to become hot before adding the dough.
You can test the temperature by dropping a tiny piece of dough into the oil. It should begin sizzling and rise toward the surface.
The oil should be hot enough to cook and brown the outside without being so hot that the exterior burns before the middle has cooked.
Carefully place the bannock pieces into the hot oil. Avoid overcrowding the skillet. Frying too many pieces at once can lower the oil temperature and may prevent the bannock from becoming crisp.
Cook each piece for approximately two to three minutes per side, turning it once.
Look for a deep golden-brown exterior and a puffed appearance.
Cooking times can vary depending on the thickness of the dough and the temperature of the oil, so use the color and texture as your main guide rather than relying only on the clock.
How to Tell When Bannock Is Done
Properly cooked fried bannock should have a golden, crisp outside and a soft interior.
If the outside becomes very dark quickly while the inside still seems doughy, reduce the heat. This allows the center more time to cook.
If the bannock is taking a long time to brown and seems to be absorbing excessive oil, the oil may not be hot enough.
Maintaining a steady cooking temperature is one of the easiest ways to improve your results.
Once the pieces are cooked, use tongs or a slotted spoon to transfer them carefully from the skillet.
Place them on a plate lined with paper towels. This helps absorb excess oil from the surface.
Serve them while they are still warm for the best texture.
Sweet and Savory Ways to Enjoy Fried Bannock
One reason bannock has remained such a versatile food is that it can be served in many different ways.
For a sweet breakfast or snack, serve warm bannock with butter, honey, jam, or another favorite spread.
A light dusting of cinnamon sugar can also turn freshly fried bannock into a simple sweet treat.
For a savory meal, place warm bannock alongside soup or stew. The crisp exterior and soft middle make it excellent for dipping into hearty dishes.
You can also serve it as part of a simple breakfast spread with butter and preserves.
The optional sugar in the dough makes this recipe adaptable. Keep it in for a subtly sweet flavor or omit it when you want a more neutral bread.
Tips for Making the Best Fried Bannock
Add the Liquid Slowly
Flour does not always absorb liquid in exactly the same way. Start with the smaller amount of liquid and add more only when necessary.
Don’t Over-Knead
Gentle handling is one of the keys to tender bannock. Once the dough has formed, a few kneading motions are enough.
Keep the Pieces Similar in Size
Uniform pieces are easier to fry because they tend to finish cooking around the same time.
Don’t Overcrowd the Skillet
Give each piece enough room to fry properly. Cooking in batches is better than filling the skillet too heavily.
Watch the Heat
Medium-high heat can work well, but every stove and skillet behaves differently. Adjust the temperature if the bannock is browning too quickly or too slowly.
Drain After Frying
A short rest on paper towels removes some of the excess surface oil and keeps the finished bannock more pleasant to eat.
Can You Make Bannock With Water Instead of Milk?
Yes. This recipe allows either warm water or milk.
Water creates a simple, straightforward bannock, while milk can provide a slightly richer taste and tender texture.
Both options work with the same basic method, so you can choose based on what you have available.
Can Fried Bannock Be Made Ahead?
Fried bannock is best when freshly cooked and served warm. That is when the exterior has its most appealing crispness and the center remains soft.
If you have leftovers, allow them to cool before storing them in a covered container.
When ready to serve, gently reheat them in a skillet or oven. Reheating can restore some of the warmth and texture, although freshly fried bannock will generally have the best crisp exterior.
A Simple Recipe for Breakfast, Dinner, or Snacks
This easy fried bannock recipe is a great example of how a few pantry staples can become something comforting and satisfying.
The dough requires no yeast and does not need a long rise. Once the ingredients are combined, the dough is gently shaped and fried until golden.
For breakfast, pair it with butter, honey, or jam. For an afternoon snack, try cinnamon sugar. At dinner, serve it beside a hearty stew or soup.
Because the basic flavor is relatively mild, bannock can fit into many different meals.
A Note About Bannock’s History and Traditions
Bannock is more than simply a fried bread recipe. Different forms of bannock have been part of food traditions across Canada, including Métis and Indigenous food ways. Historical recipes and museum resources show that bannock has been prepared using different cooking methods and ingredients, and there is considerable regional variation.
Parks Canada describes bannock as a staple food with variations across Canada, while historical records also document its use as a practical food in settings where cooks needed something filling and relatively easy to prepare.
Because bannock has many cultural and regional forms, it is best to recognize that this recipe represents one style of fried bannock, rather than claiming it is the single authentic version.
That variety is part of what makes bannock so interesting. Families and communities have adapted recipes according to the ingredients available to them and the way they traditionally cooked.
Why This Recipe Belongs in Your Homemade Bread Collection
If you enjoy simple bread recipes, this one is worth trying because it doesn’t require specialized equipment or advanced baking skills.
The ingredient list is short, the preparation is quick, and the dough is forgiving as long as you avoid adding too much liquid or overworking it.
The finished result is particularly satisfying: crisp around the edges, golden on the outside, and soft inside.
Whether you call it fried bannock, bannock bread, or homemade fried bread, the basic appeal is the same—a warm, comforting bread that can be enjoyed with both sweet and savory foods.
For a first attempt, keep the pieces moderately thick and pay close attention to the frying temperature. Once you become familiar with the dough, you can experiment with different shapes and serving combinations while keeping the basic recipe unchanged.
Fried Bannock Recipe
Prep Time: About 10 minutes
Cook Time: About 10–15 minutes
Total Time: About 20–25 minutes
Servings: Varies depending on size
Ingredients
- 2 cups all-purpose flour
- 1 tablespoon baking powder
- 1/2 teaspoon salt
- 1 tablespoon sugar, optional
- 2 tablespoons lard, butter, or oil, plus more for frying
- 3/4 to 1 cup warm water or milk, added gradually
Instructions
- In a large bowl, whisk together the flour, baking powder, salt, and optional sugar.
- Add the lard, butter, or oil and work it into the flour mixture until it resembles coarse crumbs.
- Gradually pour in the warm water or milk, stirring gently until a soft dough forms.
- Transfer the dough to a lightly floured surface and knead gently three or four times. Avoid overworking it.
- Pat or roll the dough to about 1/2 inch thick. Cut into rounds, wedges, strips, or your preferred shapes.
- Heat about 1 inch of oil in a deep skillet over medium-high heat.
- Test the oil with a small piece of dough. It should sizzle and float when the oil is ready.
- Carefully fry the bannock pieces for about 2–3 minutes per side, turning once, until golden brown and puffed.
- Remove with tongs or a slotted spoon and place on paper towels to drain excess oil.
- Serve warm with butter, jam, honey, or cinnamon sugar, or enjoy alongside soup and stew.