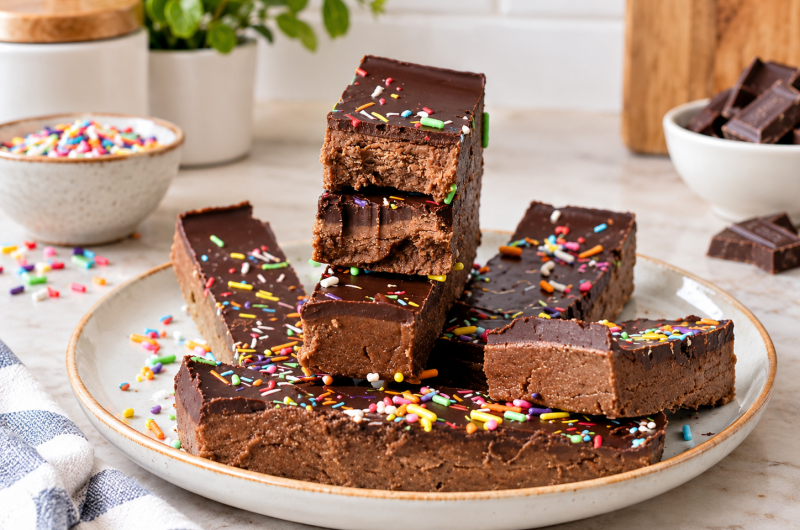
Brownie Protein Bars are a simple homemade snack that combines the rich flavor of chocolate brownies with the convenience of a protein-packed energy bar. They require only a handful of everyday ingredients and can be prepared in about 20 minutes, making them a practical choice when you want something sweet, satisfying, and easy to keep in the refrigerator.
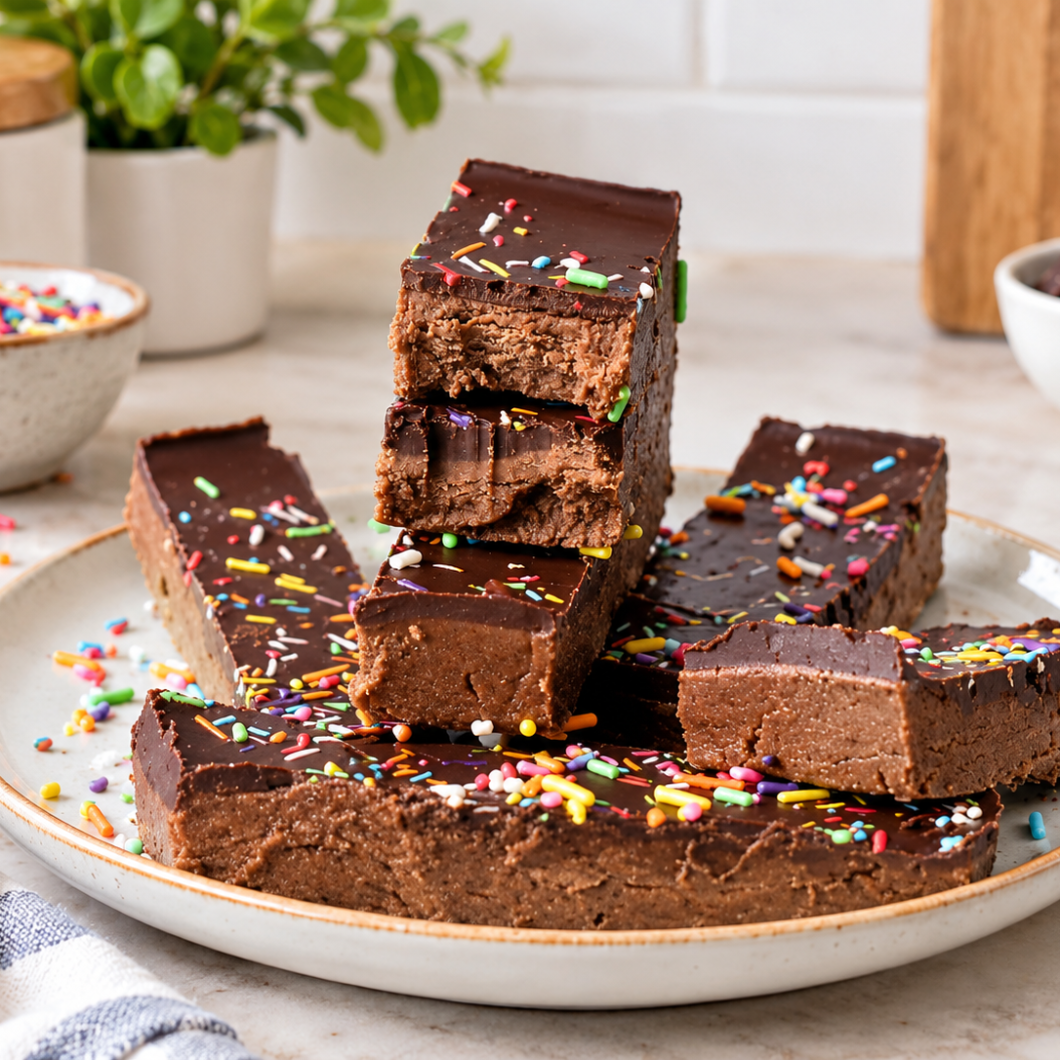
With peanut butter, cocoa powder, chocolate protein powder, maple syrup, and a layer of melted dark chocolate, these bars have a soft, fudgy texture that makes them feel much more like a brownie than a traditional protein snack.
These homemade protein bars are especially useful when you want a quick snack after exercise, between meals, or during a busy day. Instead of relying on packaged protein bars, you can make a batch at home and control exactly what goes into them.
The combination of peanut butter and protein powder gives the bars a substantial texture, while unsweetened cocoa powder brings a deep chocolate taste. A thin topping of dark chocolate adds extra richness and gives the finished bars a polished appearance.
These Protein Bars
Quick and easy preparation
One of the biggest advantages of these Brownie Protein Bars is how little time they require. There is no complicated baking process, lengthy preparation, or special equipment needed. The mixture is simply stirred together, pressed into a loaf pan, covered with melted chocolate, and chilled until firm. The entire process takes roughly 20 minutes, including the short freezer time needed to set the chocolate topping.
Rich chocolate brownie flavor
If you enjoy chocolate desserts but also want a more filling snack, these bars offer a useful middle ground. Unsweetened cocoa powder and chocolate protein powder create a strong chocolate flavor, while the peanut butter adds creaminess and a subtle nutty taste. The melted dark chocolate topping provides an additional layer of chocolate that makes each bite taste indulgent without requiring a traditional brownie recipe.
A convenient protein-rich snack
Each bar contains approximately 12 grams of protein according to the provided nutritional information. That makes these bars a convenient option for people looking for a protein-containing snack that can be prepared ahead of time.
They are easy to portion, store, and grab whenever you need something quick. Keeping a batch chilled means you can have a ready-to-eat snack available without preparing something from scratch every day.
Ingredients for Brownie Protein Bars
Peanut butter
Peanut butter forms the creamy base of the mixture and helps bring the ingredients together. It also contributes a rich nutty flavor that works particularly well with cocoa and chocolate. For the best texture, use peanut butter that stirs easily and is not excessively dry. The peanut butter plays an important role in making the mixture soft enough to press into the loaf pan.
Maple syrup
Maple syrup provides sweetness while also adding moisture to the mixture. Because these bars do not use a traditional baked brownie batter, the liquid sweetener helps create the consistency needed to bring the dry ingredients and peanut butter together. Its mild caramel-like flavor also complements the chocolate and peanut butter combination.
Unsweetened cocoa powder
Unsweetened cocoa powder gives the bars their dark chocolate character. Since the protein powder and maple syrup already contribute flavor and sweetness, unsweetened cocoa is useful for adding concentrated chocolate flavor without introducing additional sugar. Mixing it thoroughly with the other ingredients helps ensure that the finished bars have an even chocolate taste.
Chocolate protein powder
Chocolate protein powder provides the main protein component of the recipe while strengthening the chocolate flavor. The original recipe uses pea protein powder, although the accompanying notes mention that peanut- and almond-based protein powders can also work. Different protein powders may absorb liquid differently, so the consistency of the mixture should be checked while mixing.
Dark chocolate chips and coconut oil
The topping is made with dark chocolate chips and coconut oil. Melting these together produces a smooth chocolate layer that spreads easily over the protein bar mixture. Once chilled, the topping becomes firm and gives every bar a satisfying chocolate finish. The small amount of coconut oil helps create a smoother melted consistency.
How to Make Brownie Protein Bars
Prepare the loaf pan
Begin by lining a 9-inch x 5-inch loaf pan with parchment paper. Make sure the parchment covers the base and provides enough coverage to make removing the chilled bars easier. Setting up the pan before preparing the mixture saves time and prevents the protein dough from sitting while you prepare the chocolate topping.
Mix the protein bar dough
Add the peanut butter, maple syrup, chocolate protein powder, and unsweetened cocoa powder to a large mixing bowl. Stir the ingredients thoroughly with a rubber spatula. As the mixture comes together, it should form a dough that gathers into a ball. The ideal consistency should feel soft and workable rather than extremely dry or excessively sticky.
The texture is important because it determines how easily the mixture will press into the pan. If your dough feels too dry, add 1 tablespoon of plant-based milk and mix it in. If the mixture becomes too wet, add more protein powder gradually until it firms up. Protein powders vary between brands, so small adjustments may sometimes be necessary to reach the right consistency.
Press the mixture into the pan
Once the dough has reached the right consistency, transfer it to the parchment-lined loaf pan. Use the rubber spatula or your hands to press it down firmly and evenly. Try to create a level surface from one end of the pan to the other. An even layer will make it easier to spread the chocolate topping and cut the finished bars into similar-sized portions.
There is no need to bake the mixture. This is a no-bake protein bar recipe, which is one reason it comes together so quickly. Pressing the mixture firmly also helps the bars hold their shape once chilled.
Make the chocolate topping
Place the dark chocolate chips and coconut oil in a microwave-safe bowl. Microwave the mixture for 30 seconds, then remove the bowl and stir. Continue heating in short intervals, stirring between each one, until the chocolate is completely melted and smooth. Avoid overheating the chocolate, as it can become difficult to work with if it gets too hot.
Once the chocolate is smooth, pour it over the protein bar mixture. Tilt the loaf pan gently so the melted chocolate spreads across the surface. You can also use a spatula to help distribute it evenly if necessary.
Chill and slice
Place the loaf pan in the freezer for about 12 minutes, or until the chocolate topping has become firm. Once the chocolate is set, remove the pan and use a long, sharp knife to cut the mixture into bars. For cleaner cuts, allow the knife to move through the chilled chocolate in a steady motion rather than pressing down too aggressively.
The recipe makes 8 bars, making it easy to divide the batch into individual portions. Once cut, the bars are ready to enjoy or store for later.
Tips for Getting the Best Texture
Check the dough before pressing it into the pan
The consistency of the protein mixture is one of the most important parts of this recipe. It should hold together when pressed but should not feel excessively sticky. If it crumbles and refuses to form a cohesive dough, add a small amount of plant-based milk. If it feels overly wet, gradually incorporate additional protein powder until it becomes firm enough to handle.
Use a suitable protein powder
Protein powders can behave differently depending on their ingredients and formulation. The original recipe uses pea protein powder, but the notes also mention peanut and almond-based protein powders. If you change the protein powder, pay attention to the texture while mixing because some varieties may absorb more liquid than others.
Spread the chocolate evenly
For an attractive finished bar, try to distribute the melted chocolate across the entire surface. Tilting the pan gently can help the chocolate move into the corners. If necessary, use the back of a spoon or a spatula to smooth the top before chilling.
Ingredient Substitutions
Alternative nut butters
The original notes allow several alternatives to peanut butter. Almond butter or cashew butter can be used, while sunflower seed butter or tahini can provide an option for a nut-free version. Keep in mind that different nut and seed butters may have different thicknesses, so the final dough consistency may vary slightly.
Alternative liquid sweeteners
Maple syrup can be replaced with other liquid sweeteners mentioned in the original notes, including coconut nectar, agave syrup, or sugar-free alternatives. Because the sweetener also contributes moisture, the consistency of the mixture should be checked after making a substitution.
Protein powder options
Pea protein powder is the variety used in the original recipe. Peanut- and almond-based protein powders are also mentioned as alternatives. When changing the protein powder, adjust the mixture only as needed to achieve a workable dough consistency.
When to Enjoy Brownie Protein Bars
After a workout
These bars can be a convenient post-workout snack because each serving provides protein along with carbohydrates and fats. They are easy to prepare in advance, so you can keep them chilled and have one ready when you finish exercising.
As an afternoon snack
A homemade chocolate protein bar can also work well as an afternoon snack when you want something sweet but more substantial than a small dessert. The combination of peanut butter, protein powder, and chocolate gives the bars a satisfying texture that can help make snack time feel more filling.
For busy mornings
These bars can be prepared ahead of time and stored in the refrigerator, making them useful for mornings when there is little time to prepare food. Cutting the batch into individual bars also makes portioning simple.
Storage Notes
Refrigerator storage
Store the finished Brownie Protein Bars in the refrigerator for up to 2 weeks. Keeping them chilled helps maintain their firm texture and keeps the chocolate topping set. Place them in a suitable airtight container to protect them from absorbing unwanted refrigerator odors.
Freezer preparation
The freezer is used briefly during preparation to firm up the chocolate layer. The original storage instruction specifically recommends refrigeration for longer-term storage, so follow that guidance when keeping the finished bars for up to two weeks.
Frequently Asked Questions
Are these Brownie Protein Bars baked?
No. These are no-bake protein bars. The base is mixed together and pressed directly into a parchment-lined loaf pan. The only heating involved is melting the dark chocolate chips and coconut oil for the topping.
How much protein is in one bar?
According to the provided nutritional information, one bar contains approximately 12.1 grams of protein. The exact nutritional values can vary depending on the specific brands and ingredients used.
Can I use another nut butter?
Yes. The original notes mention almond butter and cashew butter as alternatives to peanut butter. Sunflower seed butter or tahini can also be used when a nut-free option is needed.
How long do the bars last?
The original storage recommendation is to keep the bars refrigerated for up to 2 weeks. Store them properly in a suitable container to maintain their texture and freshness.
Can I use a different protein powder?
Yes. The original recipe uses pea protein powder, while the notes also mention peanut- and almond-based protein powders. Since protein powders vary in how much moisture they absorb, check the consistency and make small adjustments if necessary.
High Protein Brownies Bars
 Recipe by admin
These Brownie Protein Bars are quick, no-bake chocolate protein bars made with peanut butter, maple syrup, cocoa powder, chocolate protein powder, and a dark chocolate topping.
8
servings10
minutes262.1
kcal10
minutes20
minutesIngredients
- Brownie Protein Bar Base
¾ cup peanut butter
¼ cup maple syrup
2 tablespoons unsweetened cocoa powder
½ cup chocolate protein powder
- Chocolate Topping
½ cup dark chocolate chips
1 teaspoon coconut oil
Directions
- Line a 9-inch x 5-inch loaf pan with parchment paper and set it aside.
- Add the peanut butter, maple syrup, chocolate protein powder, and unsweetened cocoa powder to a large mixing bowl.
- Stir the ingredients together with a rubber spatula until they form a cohesive dough that comes together into a ball. The mixture should not be excessively dry or sticky.
- If the dough is too dry, mix in 1 tablespoon of plant-based milk. If it is too wet, add additional protein powder as needed to create a firmer consistency.
- Transfer the dough to the prepared loaf pan and press it into an even layer.
- Add the dark chocolate chips and coconut oil to a microwave-safe bowl. Microwave for 30 seconds, then stir. Continue heating in short intervals until the chocolate is completely melted and smooth.
- Pour the melted chocolate mixture over the protein bar base. Tilt the pan gently or use a spatula to spread the chocolate evenly across the surface.
- Add plant-based sprinkles on top for decoration, if desired.
- Place the loaf pan in the freezer for approximately 12 minutes, or until the chocolate layer is firm.
- Remove the chilled mixture from the pan and cut it into 8 bars using a long, sharp knife.
Notes
- Protein powder: Pea protein powder is used in the original recipe. Peanut- or almond-based protein powder can also be used.
- Texture: If the mixture is too dry, add 1 tablespoon of plant-based milk. If it is too wet, add a little more protein powder.
- Nut butter: Peanut butter can be replaced with almond butter, cashew butter, sunflower seed butter, or tahini.
- Sweetener: Maple syrup can be replaced with coconut nectar, agave syrup, or a sugar-free liquid sweetener.
- Chocolate topping: Melt the chocolate and coconut oil in short microwave intervals, stirring between each interval.
- Storage: Keep the bars refrigerated in an airtight container for up to 2 weeks.
Nutrition Facts
- Calories: 262.1kcal
- Fat: 16.8g
- Carbohydrates: 19.7g
- Fiber: 2.4g
- Sugar: 12.4g
- Protein: 12.1g